(Updated Rock ships info.) Tag: sourceedit |
(Updated Auto-ships info.) Tag: sourceedit |
||
| Line 730: | Line 730: | ||
Be careful if you're using [[boarding]] as a way of taking out some initial [[systems]] (e.g. [[Shields]]), since you will need an at least level 2 [[teleporter]] to be able to teleport 100 health crew members back before suffocating . [[Races/Crew Members#Rockmen|Rock]] and [[Races/Crew Members#Crystal|Crystal]] members can last a little longer due to their higher health and respective abilities, thus with these the boarding is survivable even with level 1 teleporter. With a level 3 teleporter you can board even with [[Zoltan]] members if you have no other race. Lanius members, of course, can board these ships without a problem because they don't need oxygen. |
Be careful if you're using [[boarding]] as a way of taking out some initial [[systems]] (e.g. [[Shields]]), since you will need an at least level 2 [[teleporter]] to be able to teleport 100 health crew members back before suffocating . [[Races/Crew Members#Rockmen|Rock]] and [[Races/Crew Members#Crystal|Crystal]] members can last a little longer due to their higher health and respective abilities, thus with these the boarding is survivable even with level 1 teleporter. With a level 3 teleporter you can board even with [[Zoltan]] members if you have no other race. Lanius members, of course, can board these ships without a problem because they don't need oxygen. |
||
| + | ---- |
||
[[File:Auto_Scout.jpg|thumb|300px]] |
[[File:Auto_Scout.jpg|thumb|300px]] |
||
| − | ===Auto-Scout |
+ | === Auto-Scout === |
blueprint: AUTO_BASIC |
blueprint: AUTO_BASIC |
||
| − | + | Hull Strength: 6 |
|
| − | *Power 6-25 |
||
| − | *[[Weapon Control|weapon control]] 4-8 |
||
| − | *[[Engines]] 2-8 |
||
| − | *[[Piloting|cockpit]] 1-2 |
||
| ⚫ | |||
| − | ** [[Shields]] 0-8 |
||
| − | ** [[Cloaking]] 0-3 |
||
| − | ** [[Mind Control]] 0-1 |
||
| − | ** [[Hacking]] 0-1 |
||
| + | Systems |
||
| − | It starts with '''10''' missiles. |
||
| + | *[[File:EnginesCircle.png|link=File:EnginesCircle.png]] [[Engines]] (2-8) |
||
| + | *[[File:WeaponControlCircle.png|link=File:WeaponControlCircle.png]] [[Weapons]] (2-8) |
||
| + | *[[File:PilotingCircle.png|link=File:PilotingCircle.png]] [[Piloting]] (1-2) |
||
| ⚫ | |||
| + | *[[File:ShieldsCircle.png|link=File:ShieldsCircle.png]] [[Shields]] (2-8) |
||
| + | *[[File:CloakingCircle.png|link=File:CloakingCircle.png]] [[Cloaking]] (1-3) |
||
| + | ---- |
||
| + | ==== Auto-Surveyor ==== |
||
| + | blueprint: AUTO_BASIC_DLC |
||
| + | |||
| + | Hull Strength: 6 |
||
| + | |||
| + | Systems |
||
| + | *[[File:EnginesCircle.png|link=File:EnginesCircle.png]] [[Engines]] (2-8) |
||
| + | *[[File:WeaponControlCircle.png|link=File:WeaponControlCircle.png]] [[Weapons]] (2-8) |
||
| + | *[[File:PilotingCircle.png|link=File:PilotingCircle.png]] [[Piloting]] (1-2) |
||
| ⚫ | |||
| + | *[[File:ShieldsCircle.png|link=File:ShieldsCircle.png]] [[Shields]] (2-8) |
||
| + | *[[File:MindControlCircle.png|link=File:MindControlCircle.png]] [[Mind Control]] (1-2) |
||
---- |
---- |
||
| ⚫ | |||
| ⚫ | |||
| ⚫ | |||
| ⚫ | |||
blueprint: AUTO_ASSAULT |
blueprint: AUTO_ASSAULT |
||
| − | + | Hull Strength: 8 |
|
| − | *Power 8-25) |
||
| − | *[[Weapon Control|weapons room]] 4-7 |
||
| − | *[[Shields]] 2-10, 2-9 as of AE update |
||
| − | *[[Engines|engine room]]2-5 |
||
| − | *[[Piloting|cockpit]] 1-3 |
||
| ⚫ | |||
| − | ** [[Drone Control]] 0-6 |
||
| − | ** [[Hacking]] 0-1 |
||
| + | Systems |
||
| − | It starts with '''10''' missiles. |
||
| + | *[[File:ShieldsCircle.png|link=File:ShieldsCircle.png]] [[Shields]] (2-9) |
||
| + | *[[File:EnginesCircle.png|link=File:EnginesCircle.png]] [[Engines]] (1-5) |
||
| + | *[[File:WeaponControlCircle.png|link=File:WeaponControlCircle.png]] [[Weapons]] (0-6) |
||
| + | *[[File:DroneControlCircle.png|link=File:DroneControlCircle.png]] [[Drone Control]] (2-6) |
||
| + | *[[File:PilotingCircle.png|link=File:PilotingCircle.png]] [[Piloting]] (1-2) |
||
| + | ---- |
||
| + | |||
| + | ==== Auto-Hacker ==== |
||
| + | blueprint: AUTO_ASSAULT_DLC |
||
| + | |||
| + | Hull Strength: 8 |
||
| + | |||
| + | Systems |
||
| + | *[[File:ShieldsCircle.png|link=File:ShieldsCircle.png]] [[Shields]] (2-8) |
||
| + | *[[File:EnginesCircle.png|link=File:EnginesCircle.png]] [[Engines]] (1-5) |
||
| + | *[[File:WeaponControlCircle.png|link=File:WeaponControlCircle.png]] [[Weapons]] (2-7) |
||
| + | *[[File:PilotingCircle.png|link=File:PilotingCircle.png]] [[Piloting]] (1-3) |
||
| + | *[[File:HackingCircle.png|link=File:HackingCircle.png]] [[Hacking]] (1-2) |
||
| + | ---- |
||
===Weapons=== |
===Weapons=== |
||
Revision as of 21:11, 23 September 2015
Enemy Ship General Info
Enemy ships can have Systems that exceed 8, which is the limit for players. Most commonly, this is seen late game with ships having been seen with 10 in Shields or Weapons. Typically, it's the larger more powerful ships that will go beyond 8 limit. No other system exceeds the 8 limit, though it should be noted that the Rebel Flagship uses special versions of Drones that cost less energy, giving it the ability to use what seems to be more than 8 in Drone Control.
Pirate ships can have a few differences from their counterparts. In addition to the paint job, a few exceptions allow some ships will have different layouts and new Systems installed. In addition, Pirates will always have the same amount of crew but of various races (excluding Crystal, though Lanius Pirates may appear in the Abandoned Sector).
Enemy ships usually have about 10 Missiles and 4 Drones stocked, but this can vary.
Crystal Ships
Crystal ships use crystal weapons and the lockdown bombs, drones, and on a rare occasion, they can exceed the 8 limit. They come in two sizes, Scouts and Bombers, with the Advanced Edition Content adding two additional loadouts, Outriders and Instigators. Be wary of boarding; the enemy Crystal crew will use their Lockdown power on your crew.
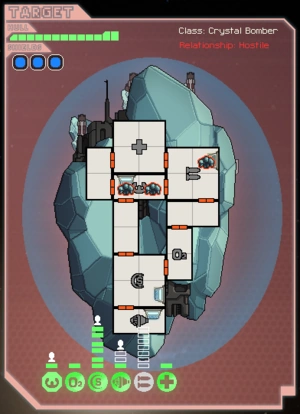
Crystal Bomber
blueprint: CRYSTAL_BOMBER
Hull Strength: 9
Crew: 2-5 Crystal
Systems
Optional
 Medbay (1-3)
- Door Control (1-3)
Crystal Instigator
blueprint: CRYSTAL_BOMBER_DLC
Hull Strength: 9
Crew: 2-5 Crystal
Systems
- Shields (2-10)
- Engines (1-5)
- Oxygen (1-3)
- Weapons (2-10)
- Piloting (1-3)
- Crew Teleporter (1-2)
- Cloaking (1-2)
Optional
- Door Control (1-3)
- Clone Bay (1-3)
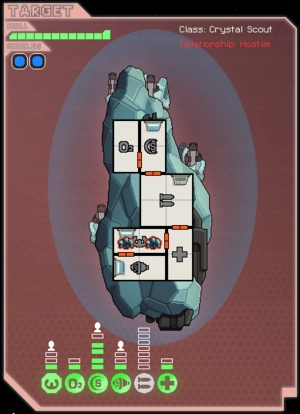
Crystal Scout
blueprint: CRYSTAL_SCOUT
Hull Strength: 7
Crew: 2-3 Crystal
Systems
Optional
- Medbay (1-3)
Crystal Outrider
blueprint: CRYSTAL_SCOUT_DLC
Hull Strength: 7
Crew: 2-3 Crystal
Systems
Optional
- Clone Bay (1-3)
Weapons
These Crystal Ships can have any of the following weapons:
Engi Ships
Engi Ships are easily distinguishable with their trademark gray hull and squarish design (see below). A Drone system is always present on Engi ships accompanied with at least one active Defense Drone. If a MedBay is present in the ship, the ship will also have an active Engi Medbot Dispersal system, which allows the Engi to take extra beatings during an assault.

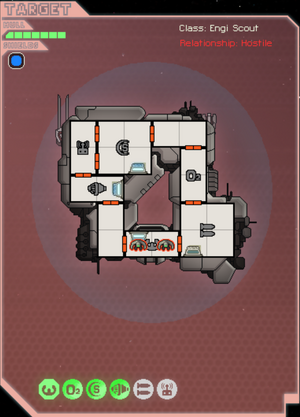
Engi Scout
blueprint: CIRCLE_SCOUT
Hull Strength: 7
Crew: 2-5 Engi
Systems
Optional
- Medbay (1-3)
- Door Control (1-3)
Augmentations
Engi Outrider
blueprint: CIRCLE_SCOUT_DLC
Hull Strength: 7
Crew: 2-5 Engi
Systems
Optional
Augmentations


Engi Bomber
blueprint: CIRCLE_BOMBER
Hull Strength: 9
Crew: 3-6 Engi
Systems
Optional
- Medbay (1-3)
- Door Control (1-3)
Augmentations
Engi Hacker
blueprint: CIRCLE_BOMBER_DLC
Hull Strength: 9
Crew: 3-6 Engi
Systems
- Shields (2-10)
- Engines (1-5)
- Oxygen (1-3)
- Weapons (2-8)
- Drone Control (2-8)
- Piloting (1-3)
- Hacking (1-3)
Optional
- Door Control (1-3)
- Clone Bay (1-3)
Augmentations
Weapons
These Engi Ships can have any of the following weapons:
- Basic Laser
- Burst Laser Mark I
- Burst Laser Mark II
- Heavy Laser Mark I
- Mini Beam
- Halberd Beam
- Glaive Beam
- Pike Beam
- Fire Beam
- Ion Blast
- Ion Blast Mark II
- Heavy Ion
Additional weapons with Advanced Edition Content enabled:
Drones
Engi Ships can have any of the following drones:
Federation Ships
Federation Ships can only be fought in the Federation Deserters random event. Otherwise, these ships are either in need (so you cannot engage them in combat) or are Pirated.

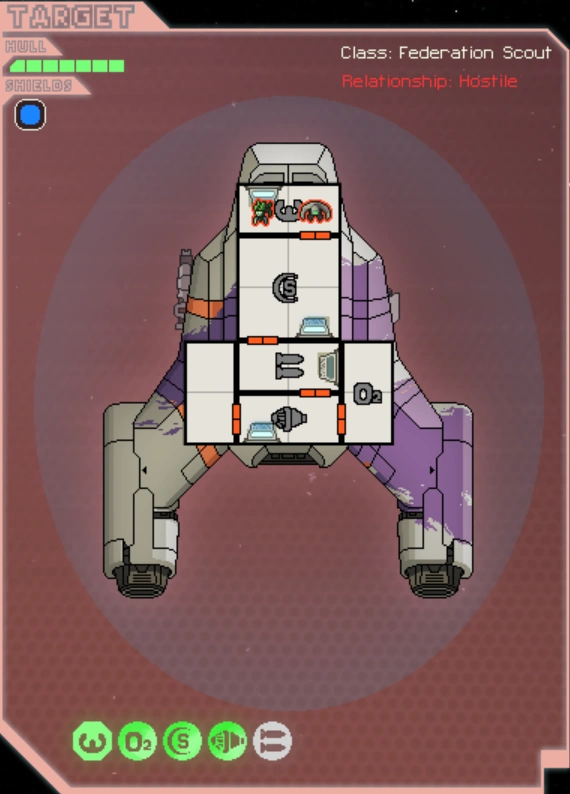
Federation Scout / Pirate Scout
blueprint: FED_SCOUT, FED_SCOUT_P
Hull Strength: 7
Crew: 2-3 Human (Pirate crew is 2-3 random)
Systems
Optional
- Door Control (1-3)
Federation Outrider / Pirate Outrider
blueprint: FED_SCOUT_DLC, FED_SCOUT_P_DLC
Hull Strength: 7
Crew: 2-3 Human (Pirate crew is 2-3 random)
Systems
Optional

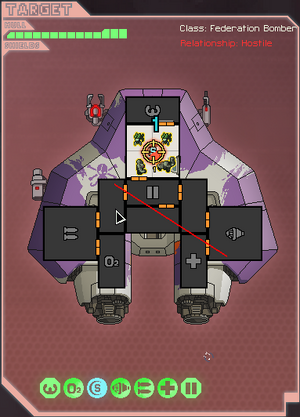
Federation Bomber / Pirate Bomber
blueprint: FED_BOMBER, FED_BOMBER_P
Hull Strength: 9
Crew: 2-6 Human (Pirate crew is 2-6 random)
Systems
Optional
- Medbay (1-3)
- Door Control (1-3)
Federation Hacker / Pirate Hacker
blueprint: FED_BOMBER_DLC, FED_BOMBER_P_DLC
Hull Strength: 9
Crew: 2-6 Human (Pirate crew is 2-6 random)
Systems
Optional
Weapons
These Federation Ships can have any of the following weapons:
- Basic Laser
- Burst Laser Mark I
- Burst Laser Mark II
- Burst Laser Mark III
- Heavy Laser Mark I
- Heavy Laser Mark II
- Leto Missiles
- Artemis Missiles
- Hermes Missile
- Breach Missiles
- Mini Beam
- Halberd Beam
- Small Bomb
Additional weapons with Advanced Edition Content enabled:
Lanius Ships
The Lanius ships are difficult to board since they have no Oxygen and a Clone Bay. Both ships come with the Emergency Respirators augment, but they cannot use it since their crew are only Lanius.
Lanius Bomber
blueprint: ANAEROBIC_BOMBER
Hull Strength: 9
Crew: 3-5 Lanius
Systems
- Shields (2-8)
- Engines (1-5)
- Weapons (2-8)
- Piloting (1-3)
- Crew Teleporter (1-3)
Optional systems
- Clone Bay (1-3)
- Door Control (1-3)
- Cloaking (1-3)
- Mind Control (1-2)
Augmentations
Lanius Scout
blueprint: ANAEROBIC_SCOUT
Hull Strength: 7
Crew: 2-3 Lanius
Systems
Optional systems
- Clone Bay (1-3)
- Door Control (1-3)
- Hacking (1-3)
Augmentations
Weapons
These Lanius Ships can have any of the following weapons:
Mantis Ships
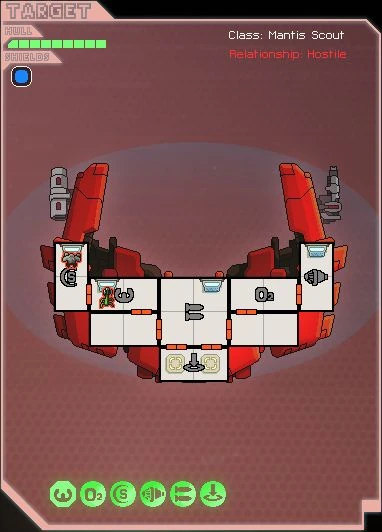
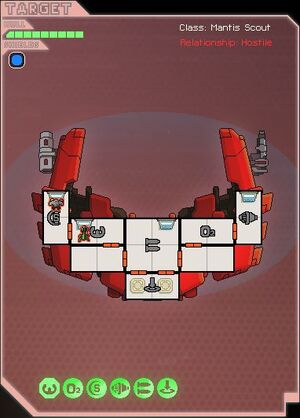
Mantis Scout / Pirate Scout
blueprint: MANTIS_SCOUT, MANTIS_SCOUT_P
Hull Strength: 7
Crew: 3-5 TOTAL, 3-5 Mantis, 0-2 Engi (Pirate crew is 3-5 random)
Systems
Optional
- Medbay (1-3)
- Door Control (1-3) [Mantis Scout only]
- Crew Teleporter (1-3)
Mantis Interceptor / Pirate Interceptor
blueprint: MANTIS_SCOUT_DLC, MANTIS_SCOUT_P_DLC
Hull Strength: 7
Crew: 2-4 TOTAL, 2-4 Mantis, 0-2 Engi (Pirate crew is 2-4 random)
Systems
Optional
- Clone Bay (1-2)
- Door Control (1-2) [Mantis Interceptor only]
- Crew Teleporter (1-2)
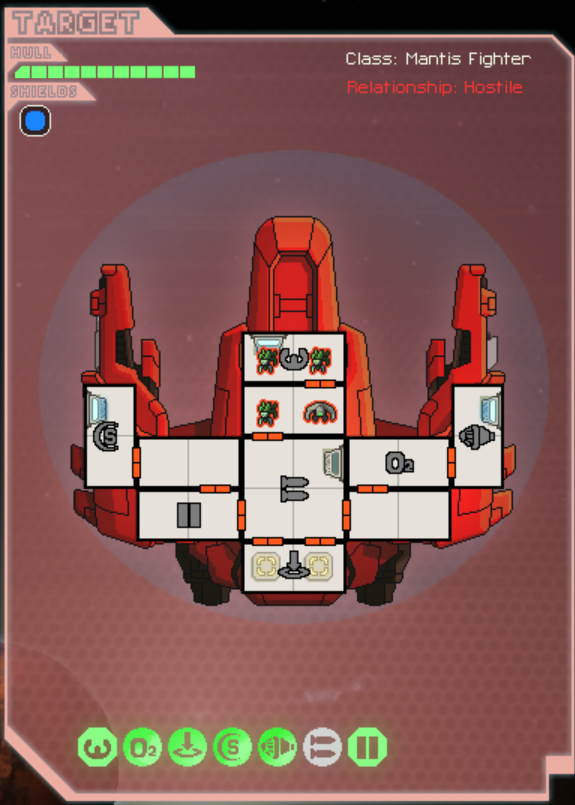
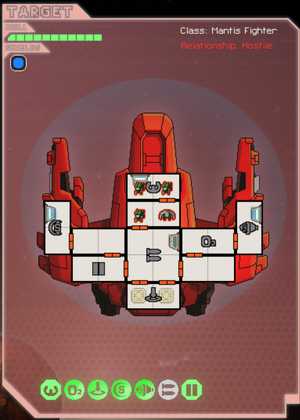
Mantis Fighter / Pirate Fighter
blueprint: MANTIS_FIGHTER, MANTIS_FIGHTER_P
Hull Strength: 9
Crew: 3-5 TOTAL, 3-5 Mantis, 0-2 Engi (Pirate crew is 3-5 random)
Systems
- Shields (2-8)
- Engines (1-5)
- Oxygen (1-3)
- Weapons (1-8)
- Medbay (1-3)
- Piloting (1-3)
- Crew Teleporter (1-3)
Optional
- Door Control (1-3)
Mantis Assault / Pirate Assault
blueprint: MANTIS_FIGHTER_DLC, MANTIS_FIGHTER_P_DLC
Hull Strength: 9
Crew: 2-5 TOTAL, 2-5 Mantis, 0-2 Engi (Pirate crew is 2-5 random)
Systems
- Shields (2-7)
- Engines (1-5)
- Oxygen (1-3)
- Weapons (1-7)
- Piloting (1-3)
- Crew Teleporter (1-2)
- Clone Bay (1-3)
Optional
- Door Control (1-3)


Mantis Bomber / Pirate Bomber
blueprint: MANTIS_BOMBER, MANTIS_BOMBER_P
Hull Strength: 11
Crew: 4-6 TOTAL, 4-6 Mantis, 0-2 Engi (Pirate crew is 4-6 random)
Systems
Optional
- Medbay (1-3)
- Door Control (1-3)
Mantis Aggressor / Pirate Aggressor
blueprint: MANTIS_BOMBER_DLC, MANTIS_BOMBER_P_DLC
Hull Strength: 11
Crew: 3-6 TOTAL, 3-6 Mantis, 0-2 Engi (Pirate crew is 3-6 random)
Systems
Optional
- Door Control (1-3)
- Clone Bay (1)
Weapons
These Mantis Ships can have any of the following weapons:
- Basic Laser
- Burst Laser Mark I
- Burst Laser Mark II
- Burst Laser Mark III
- Heavy Laser Mark I
- Heavy Laser Mark II
- Leto Missiles
- Artemis Missiles
- Hermes Missile
- Breach Missiles
- Mini Beam
- Halberd Beam
- Small Bomb
- Fire Bomb
- Ion Bomb
Additional weapons with Advanced Edition Content enabled:
Rebel Ships
The rebel ships use advanced technology, and are often better than the other ships at their stage. Rebel crews can be destroyed by boarders, as they only have humans. This is not true for pirated ships, which can even have Mantis.
Elite Fighter
blueprint: LONG_ELITE_MED, LONG_ELITE_HARD, REBEL_SKINNY_ELITE
You will encounter this ship if the rebel fleet catches up with you, or at the last sector, The Last Stand, where you will commonly fight these at different beacons. It is recommended to stay away from the rebel fleet in the early stages until you manage to upgrade things like your shields, engines and such. Except for encounters with these ships in The Last Stand, it is generally best to jump away once your FTL is charged, as the pursuing rebel ships provide no reward other than one fuel. Note: Elite Rebel fighters can have TEN in weapon levels.
According to the Editor, there are 3 ships that are Rebel Elite. It is unclear whether the game uses all three or just the last. The first two models are from the player ship list.
LONG_ELITE_MED details
- Hull 20
- Power 21-25
- Weapon 4-8
- Shields 2-8
- Engines 2-8
- O2 1-3
- Pilot 1-3
LONG_ELITE_HARD details
- Hull 30
- Power 24-25
- Weapon 4-8
- Shields 2-8
- Engines 2-8
- O2 1-3
- Pilot 1-3
REBEL_SKINNY_ELITE details
- Hull 14
- Power 13-25
- Weapon 4-10
- Shields 2-8
- Engines 2-5
- O2 1-2
- Pilot 1-3
- Medbay 1-3
- Optional systems
- Transporter 0-3
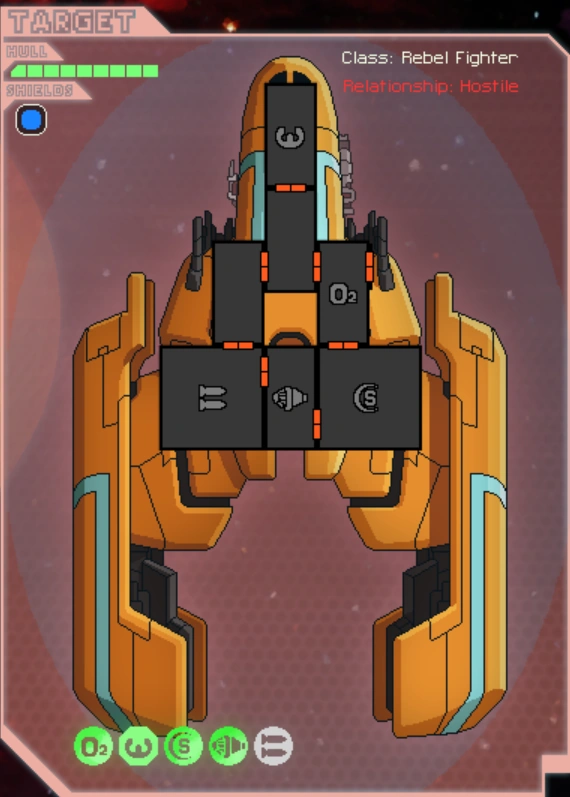
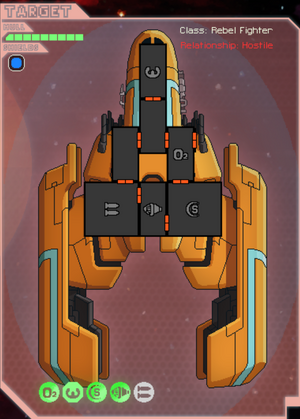
Rebel Fighter / Invader
blueprint: REBEL_SKINNY
These ships typically use Basic Lasers, Burst Laser Mk 1, and Small Bomb in earlier sectors, with Heavy Lasers also commonly used but initially depowered. In later stages these can become quite a threat with Burst Laser II and sometimes even Burst Laser III, Heavy Laser II, and breach Missiles. In sectors 5 and up crew teleporters are common but luckily the rebel ships always have a crew of only humans. Even if the ship has a medbay it can be defeated with a 4 size teleporter and at least 3 mantis for boarding with one other crew member.
- Hull 10
- Power 9-25
- Weapon 4-8
- Shields 2-8
- Engines 2-5
- O2 1-2
- Pilot 1-3
- Optional systems
- Crew Teleporter 0-1
- Medbay 0-3


Rebel Rigger / Disrupter
blueprint: DEFAULT, REBEL_FAT, REBEL_TRANSPORT Rebel Riggers often use drones, countering missiles and often ships without combat specialists as they send in boarding drones. Rebel Riggers are usually encountered trying to jump away for some reason so target the cockpit and drone control before moving on to the weapons after shields are down. System Repair Drones are almost always aboard these ships after sector 4. Beam weapons are often encountered on these ships and it is not uncommon for a Rebel Rigger to have one Beam Drone and a Mini Beam with no shield damaging weapons.
They can have up to at least 4 Drones, some time they "overcrowd" the drone control room and, as a result, make repair impossible after it's shut down.
The game has three models for the Rebel Rigger. The first model is from the player list. It may or may not appear in the game. The other two ships REBEL_FAT (Rebel Rigger) / REBEL_TRANSPORT (Rebel Transport) are nearly identical except the Transport can have TEN shields.
DEFAULT details
- Hull 10
- Power 15-25
- Weapon 4-8
- Drones 2-8
- Shields 2-8
- Engines 2-8
- O2 1-3
- Pilot 1-3
REBEL_FAT and REBEL_TRANSPORT details
- Hull 9
- Power 11-25
- Weapon 4-6
- Drones 2-8
- Shields 2-8/Shields 2-10
- Engines 2-4
- O2 1-2
- Pilot 1-2
- Optional systems
- Doors 0-3
- Medbay 0-3
Weapons
These Rebel Ships can have any of the following weapons:
- Basic Laser
- Burst Laser Mark I
- Burst Laser Mark II
- Burst Laser Mark III
- Heavy Laser Mark I
- Heavy Laser Mark II
- Leto Missiles
- Artemis Missiles
- Hermes Missile
- Breach Missiles
- Mini Beam
- Halberd Beam
- Small Bomb
Additional weapons with Advanced Edition Content enabled:
Drones
Rebel Ships equipped with a Drone Control can have any of the following drones:
- Combat Drone Mark I
- Combat Drone Mark II
- Anti-Ship Beam Drone I
- Defense Drone Mark I
- Defense Drone Mark II
- System Repair Drone
- Anti-Personnel Drone
- Boarding Drone
Additional drones with Advanced Edition Content enabled:
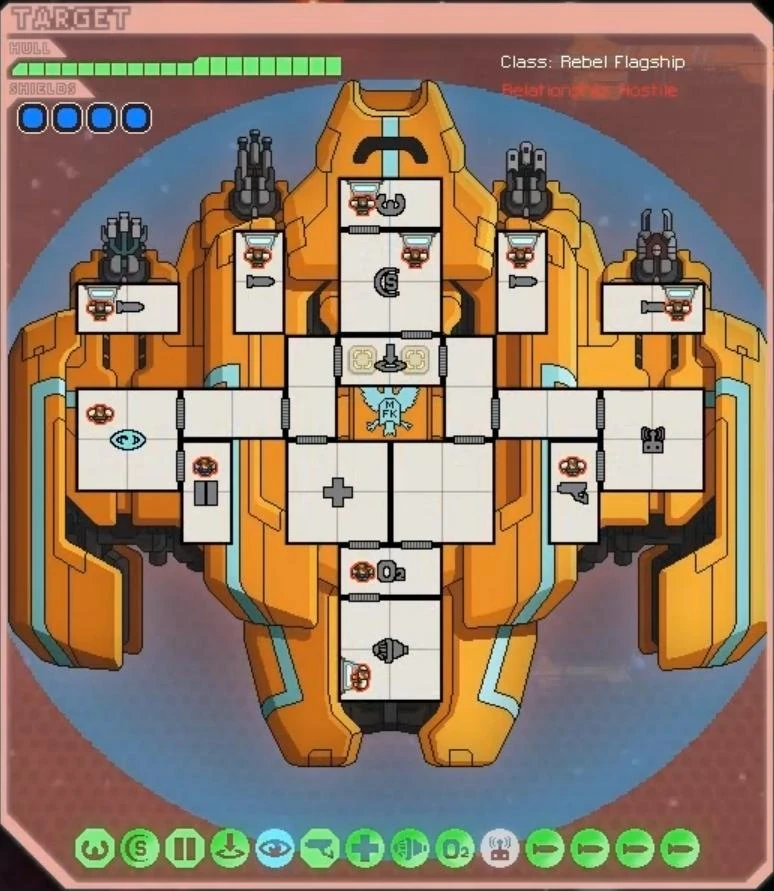
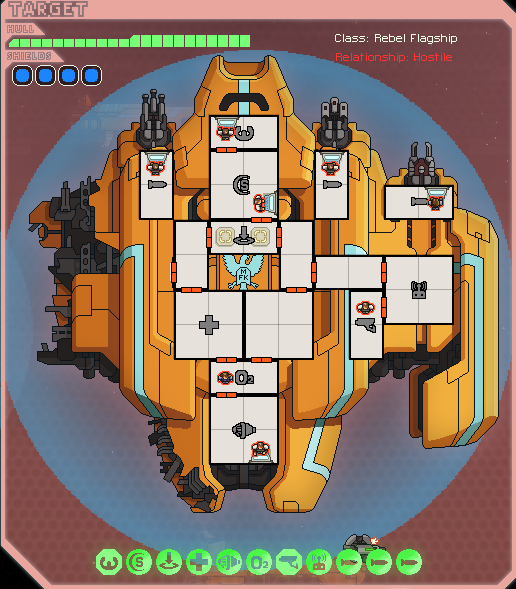
The Rebel Flagship
- Main article: The Rebel Flagship
The Rebel Flagship is the final ship you can encounter in a play through of Faster Than Light. This ship is also most likely the hardest ship you will encounter in Faster Than Light. It has three forms, each one meant to be harder than the last. It has 4 layers of shields, high dodge rate, and an individual room for each type of weapon (ion, missile, burst laser and beam) which is separate from the other rooms and can be destroyed. However, there is a crew member in each of these and thus they will be repaired. In its first form, it can cloak itself (loses for 2nd stage), in the second form it has drones (loses these for 3rd stage), and finally in its third form it has a Zoltan shield, it uses its teleporter and shoots between 5 and 10 lasers from apparently nowhere. Upon winning a section from it, a bit of it will be broken off from the ship, starting from the left, then the right and finally the ship is destroyed and you win the game. If you kill all its crew, you will get a message that a powerful AI controls it now. That's bad news: it will now automatically repair systems (rooms with breaches will be not repaired when the AI takes control, so if you use breach bombs in this encounter, the AI taking control may be good news).
In easy and normal difficulties (in standard FTL), the heavy laser and missile turrets will be separated from the main body of the flagship; in hard difficulty in Advanced Edition, they will be joined. This makes destroying the systems much more difficult as additional crew can enter to repair them. Also, on easy, though the stations are manned the weapon charge time does not decrease accordingly.
It helps greatly to have at least the following:
- Cloaking
- Teleporter
- Lvl. 6+ Weapons with at least 6 or 7 laser bolts or a Mk. 2 Ion blast, Pegasus Missiles could help a lot
- Defense Drone Mk. 1 (practically better than Mk. 2)
- 3 or 4 layers of shields
- Lvl. 6+ engine
You should first kill the human in the missile weapon (the second weapons room from the right) and destroy it with your teleporter. Next, you can do the same for the pointless and weak beam, the laser, or the ion, however it is not required. Do this in all stages, as 1. it is the easiest way to destroy it and 2. the five missiles can easily get past even a Mk. 2 defense drone. Next, just destroy its shields (Mk. 2 Ion blast can remove all layers if set to autofire, assuming it doesn't miss, and it does not cloak before you can permanently disable it's shields) and cloaking, and try to kill some crew while you're at it. Often, they will all go to fix the shields so just wait until there are 2-4 people and launch a barrage at them.
The Final Boss 1st stage
Stage 1
Special Attack: None
Special Defense: The rebel flagship has quite a long lasting cloak. This can make the fight difficult, because it allows it to repair, heal, recharge. It has quite a big crew too, so this can cause some problems getting through.
Strategy: It helps if you view this battle not just as a battle you must win at all cost; but as a preparation step for the next two battles. Although all systems will be repaired between fights, dead crew will remain dead. Killing all of the crew results in the ship's advanced AI taking over and all systems begin to auto-repair. Be aware that it loses the turret and cloak on the left after the first fight and the turret on the right and drone control after the second fight. This is the only phase where it has each of the triple-turrets. You need 3 shield, at least 30% evasion (estimation) to not die quickly. Defense drones and cloak can help negate damage too.
Another useful strategy if you have a teleporter is to send crew members, either two humans or one rock or one mantis generally works, in each of the offensive turrets, killing the crew and destroying the weapon. If you keep all your defensive abilities fully powered during this time, you can avoid most of the incoming damage, and once they are destroyed, it will have no way of damaging your ship (for the first stage), which means you can destroy it without having to worry about its weapons.
Alternatively, you should destroy all the weapons except for the laser and then kill all the crew in the rest of the ship. Fire bombs are very helpful here. This will make the other stages much easier because the laser crew cannot get to the rest of the ship, meaning you can easily board it and destroy everything. However, you have to leave at least one crew alive for this strategy or else the AI will take over.
Stage 2

Second form of the Rebel Flagship
If you emerged victorious from your first battle, the section furthest to the left breaks off, taking away its ability to cloak, its ion weapon, the door system, and up to three crew members.
Special Attack: The special attack of the second stage consist of a large squadron of anti-ship drones (around 5-10, mostly beam drones). This special attack can be very destructive if they get through your shields.
Special Defense: The boss has a defense drone deployed during this stage, rendering missiles practically useless (except Pegasus missiles that fires 2 projectiles, or if you have multiple missile systems and you sync up their shots)
Strategy: Despite the weaker special attack, this is not an easy stage, however. The defense drone and boarding drone can make life quite hard. Especially since killing the boarding drone, just makes him fire a new one almost immediately (probably causing a new breach too). There are three ways of dealing with the boarding drone:
- Shooting it down with a defense drone
- Having improved blast doors and ignore it until it enters an important room
- Damage the drone facility enough so that it stops moving
The power surge with all the drones can be devastating if you aren't careful. The Anti-ship drones will all fire at once, and can fairly easily get through your shields if you don't evade enough of the shots. If your shields drop to zero even for a fraction of a second, you may get hit by a lot of beam drones all at once. This can be catastrophic. One easy way to protect yourself from this is to activate your cloak with only one power bar. The cloak will wear off shortly before the drones go away (likely not leaving them enough time to hurt you) and will cool down just in time for you to cloak again for the next power surge. If you use 2 or 3 power bars on the cloak, it will not finish its cool down in time. This does not work with the laser burst power surge in the third stage, as the surges come too often to cloak for all of them.
Stage 3
Special Attack: The special attack of the third stage consists of a burst of laser-like attacks, about 8-9 shots that arrive almost simultaneously, they look like heavy laser blasts but do only 1 damage if get beyond your shields and hit, a well timed use of cloaking is the best way to minimize damage, or highly powered engines, shields, and 1-2 defense drone mark II (this latter is quite intensive on power requirement, but if you are in a bind this way can negate most of the damage if not all).
Special Defense: A Zoltan shield that takes 12 damage. Sometimes if its Zoltan shield is down, after a power surge it does not use its special attack but recharges it's Zoltan shields to full. Restoring its Zoltan shields will destroy all boarding drones (unpowered boarding drones may be unaffected), however boarding parties are unaffected, aside from the fact of you not being able teleport them out.
Strategy: The third stage, the attacks of the rebel ship are the strongest. Where the previous rounds a defensive strategy may have worked, the best way to deal with this stage is to deal as much damage as quickly as possible. The AI usually uses its teleporter to board you straight away, so be prepared to deal with that before you start the third stage fight (they are human boarders, and arrive only 2 at a time, so if you have trained boarders you should either wait with them on your own ship to catch the enemy boarders, or board their ship before they can do yours, and take out their teleporter, or sometimes they don't even board you if you've already boarded them).
If you have taken out all crew in the second stage of the flagship fight, then the ship will not board you. However, the AI that takes over can make the rest of the third phase more dangerous. It is best to leave only several crew alive following the second encounter (preferably you should kill most of them off in the first phase and let the rest die as the flagship loses hull pieces). If the crew are in sealed-off rooms or a critical system (i.e. engines or shields) goes down, boarding will still be disabled. To execute the latter strategy a weapon pre-igniter is absolutely required; damaging either of the aforementioned systems will cause crew to divert for repair.
AI-Controlled Rebel Ships
Automated ships are unmanned ships. This means that they automatically repair systems over time and have no oxygen on board, do note that rooms with hull breaches will not be repaired as putting out fires/repairing hull breaches is a higher repair priority than repairing the subsystem, and the AI ships have no way of repairing said breaches.
Be careful if you're using boarding as a way of taking out some initial systems (e.g. Shields), since you will need an at least level 2 teleporter to be able to teleport 100 health crew members back before suffocating . Rock and Crystal members can last a little longer due to their higher health and respective abilities, thus with these the boarding is survivable even with level 1 teleporter. With a level 3 teleporter you can board even with Zoltan members if you have no other race. Lanius members, of course, can board these ships without a problem because they don't need oxygen.
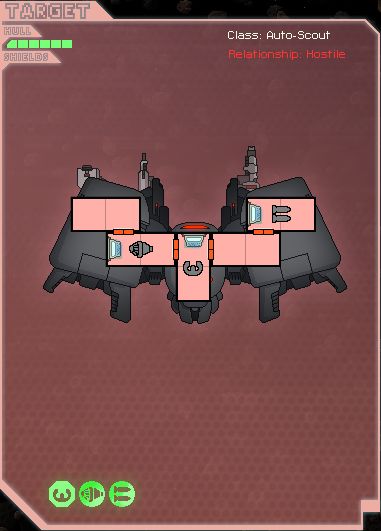

Auto-Scout
blueprint: AUTO_BASIC
Hull Strength: 6
Systems
Optional
Auto-Surveyor
blueprint: AUTO_BASIC_DLC
Hull Strength: 6
Systems
Optional
- Shields (2-8)
- Mind Control (1-2)
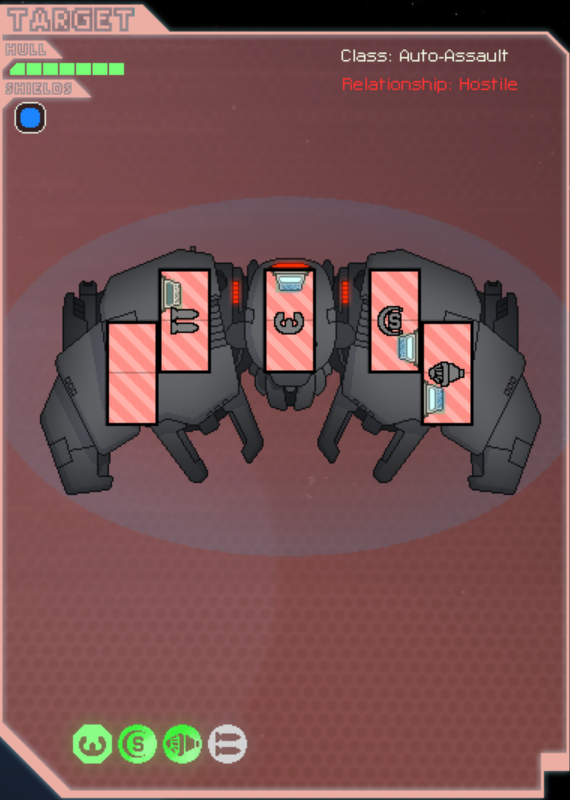
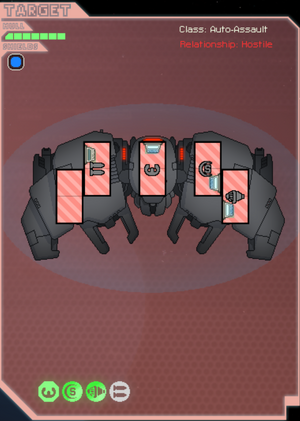
Auto-Assault
blueprint: AUTO_ASSAULT
Hull Strength: 8
Systems
- Shields (2-9)
- Engines (1-5)
- Weapons (0-6)
- Drone Control (2-6)
- Piloting (1-2)
Auto-Hacker
blueprint: AUTO_ASSAULT_DLC
Hull Strength: 8
Systems
Weapons
These Automated Ships can have any of the following weapons:
- Basic Laser
- Burst Laser Mark I
- Burst Laser Mark II
- Burst Laser Mark III
- Heavy Laser Mark I
- Heavy Laser Mark II
- Leto Missiles
- Artemis Missiles
- Hermes Missile
- Mini Beam
- Halberd Beam
- Small Bomb
- Fire Bomb
- Ion Bomb
- Ion Blast
- Heavy Ion
- Ion Blast Mark II
Additional weapons with Advanced Edition Content enabled:
Drones
Automated Ships equipped with a Drone Control can have any of the following drones:
Additional drones with Advanced Edition Content enabled:
Rock Ships
Rock ships often rely on their missile and beam weaponry. This can be easily negated though, by having a defense drone as it effectively renders missiles useless, whereas the beams practically won't even touch you if you have a good shield (Level 2 is often good, as it stops everything short of a Glaive Beam). They are equipped with Rock plating augmentation.
Rock Scouts have very cramped rooms, often allowing you to capitalize with the pike beam and hit 6 rooms after shields are down. The Rock Armor Plating is only a slight nuisance until sector 5, where Breach Missiles and Halberd/Glaive Beams become a common sight on these ships. Cloaking, as always, is useful. Boarding crews shut these ships down, especially with the Basilisk or Carnelian. Pirated Rock Scouts are a very common sight, but when the ship is not pirated it is inadvisable to use fire weapons as the Rockmen are immune to fire.
Rock Fighters can just be considered a better form of Rock Scouts and should be fought in the same way. They have teleporter capability so watch out if you have no Mantis, Rock, or Crystal crew members. Heavy missiles, heavy lasers, and rarely Glaive Beams are often on these ships so prioritize the weapons with your bombs and missiles.
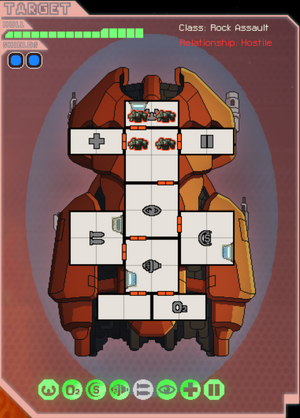
These powerful ships are never encountered pirated so never use fire weapons and only use Mantis and skilled Rock boarders. Luckily these ships only spawn in the Rock Controlled and Rock Homeworlds sectors except in very rare cases. Missiles and Burst Lasers are the most effective counter for this ship.
There are two types of Rock Assault ships; a regular and an elite; the elite may have more than 8 power to weapons and typically has more crew aboard.
The Elite Rock Assault is always the ship fought during the Rock Cruiser unlock event; do not attack it and focus on repair/dodge. It will jump away.

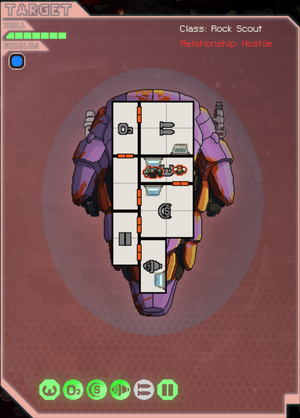
Rock Scout / Pirate Scout
blueprint: ROCK_SCOUT, ROCK_SCOUT_P
Hull Strength: 8
Crew: 2-5 Rock (Pirate crew is 2-5 random)
Systems
Optional
- Medbay (1-3) [Rock Scout only]
- Door Control (1-3) [Rock Scout only]
- Crew Teleporter (1-2) [Pirate Scout only]
Augmentations
Rock Investigator / Pirate Investigator
blueprint: ROCK_SCOUT_DLC, ROCK_SCOUT_P_DLC
Hull Strength: 8
Crew: 2-4 Rock (Pirate crew is 2-4 random)
Systems
Optional
- Clone Bay (1-3)
- Crew Teleporter (1-2) [Rock Investigator only]
Augmentations
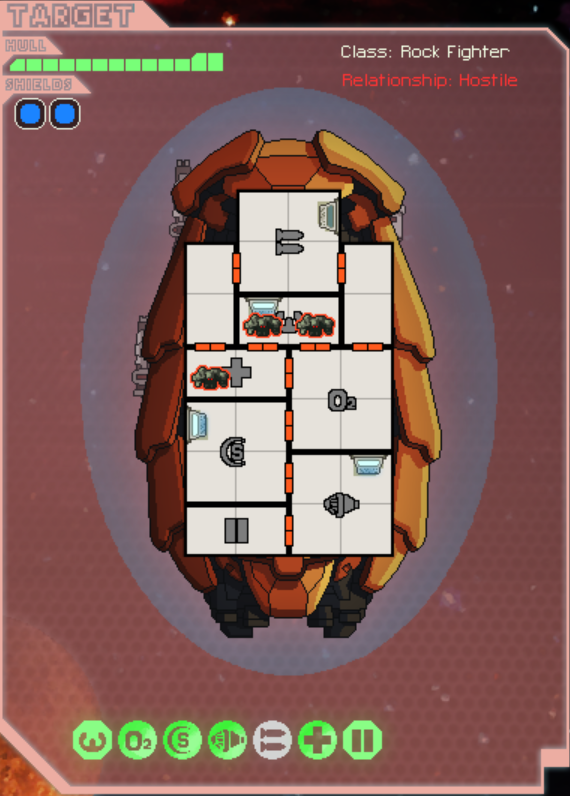

Rock Fighter / Pirate Fighter
blueprint: ROCK_FIGHT, ROCK_FIGHT_P
Hull Strength: 10
Crew: 3-5 Rock (Pirate crew is 3-5 random)
Systems
Optional
- Medbay (1-3)
- Door Control (1-3)
- Cloaking (1-3) [Pirate Fighter only]
Augmentations
Rock Interceptor / Pirate Interceptor
blueprint: ROCK_FIGHT_DLC, ROCK_FIGHT_P_DLC
Hull Strength: 10
Crew: 2-5 Rock (Pirate crew is 2-5 random)
Systems
Optional
- Clone Bay (1-3)
- Crew Teleporter (1-2)
- Cloaking (1)
Augmentations

Rock Assault
blueprint: ROCK_ASSAULT
Hull Strength: 12
Crew: 3-6 Rock
Systems
Optional
- Medbay (1-3)
- Door Control (1-3)
- Crew Teleporter (1-2)
- Cloaking (1)
Augmentations
Rock Aggressor
blueprint: ROCK_ASSAULT_DLC
Hull Strength: 12
Crew: 2-6 Rock
Systems
Optional
- Clone Bay (1-2)
- Door Control (1-3)
- Crew Teleporter (1-2)
- Cloaking (1-2)
Augmentations
Rock Assault (Elite)
Unique ship for the Rock war vessel encounter random event.
blueprint: ROCK_ASSAULT_ELITE
Hull Strength: 12
Crew: 4-5 Rock
Systems
Optional
- Medbay (1-2)
- Door Control (1-3)
- Crew Teleporter (1-2)
Augmentations
Weapons
These Rock Ships can have any of the following weapons:
- Basic Laser
- Burst Laser Mark I
- Burst Laser Mark II
- Burst Laser Mark III
- Heavy Laser Mark I
- Heavy Laser Mark II
- Leto Missiles
- Artemis Missiles
- Hermes Missile
- Breach Missiles
- Mini Beam
- Halberd Beam
- Small Bomb
- Heavy Ion
Additional weapons with Advanced Edition Content enabled:
Slug Ships
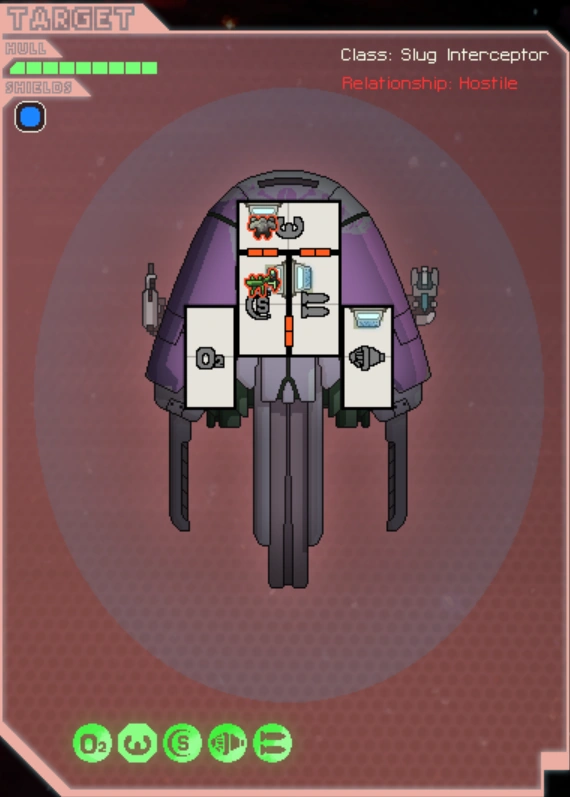
On Easy mode, Slug Interceptors have no doors connecting the oxygen or engine system, so killing the crew should be extremely easy, as you can destroy the engines to prevent them from jumping away, then the oxygen to kill the crew - slowly, that is. These ships are usually no trouble but have four weapons at times so don't slack off.
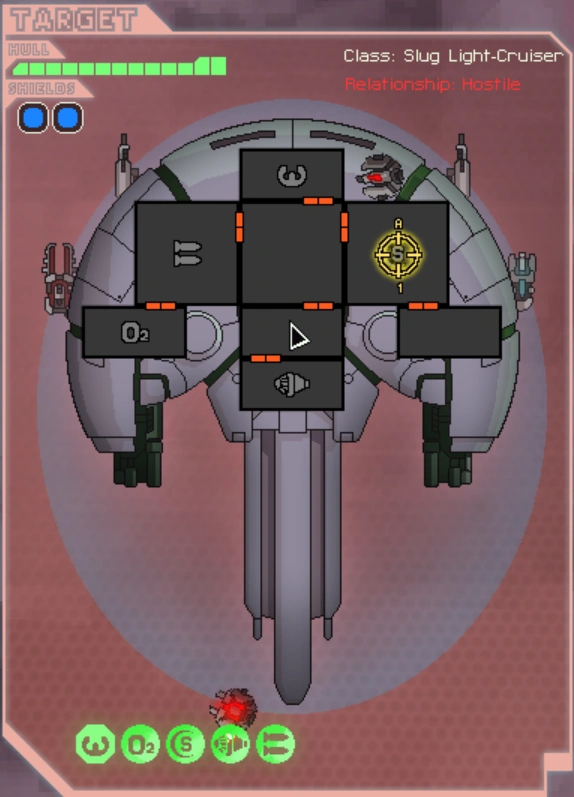
Slug Light-Cruisers are effective ships that are most commonly found in, naturally, Slug sectors. The Slugs are a treacherous race, so one of your systems (usually Oxygen, Doors, or Shields) will be weakened or destroyed about 50% of the time. Encountering these ships in Plasma Storms is possible, so prepare to divert power. Fire Beams, Breach Bombs, and Burst Lasers are commonly used by these ships. Counter with boarders and fire weapons of your own. They can have up to five layers of shields.
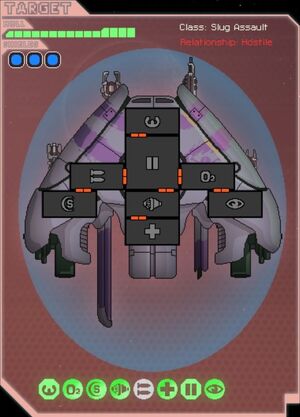
Some Slug Assault ships can have level ten weapons or shields; possibly both. The most powerful ones in sector 7 can even be better than the Rebel Flagship phase 1, so there is no shame in jumping away if necessary. Slug Assault ships should be fought with beams and be sure to keep killing the crew as the "most likely to succeed" option.
Captain Nights' cruiser, the Black Raven, is always a Slug Assault/Instigator class.

Slug Interceptor / Pirate Interceptor
blueprint: JELLY_BUTTON, JELLY_BUTTON_P
Hull Strength: 9
Crew: 2-3 Slug (Pirate crew is 2-3 random)
Systems
Optional
- Door Control (1-3) [Pirate Interceptor only]
Augmentations
Slug Scout / Pirate Scout
blueprint: JELLY_BUTTON_DLC, JELLY_BUTTON_P_DLC
Hull Strength: 9
Crew: 2-3 Slug (Pirate crew is 2-3 random)
Systems
Optional
- Mind Control (1-2) [Pirate Scout only]
Augmentations

Slug Light-Cruiser / Pirate Light-Cruiser
blueprint: JELLY_CROISSANT, JELLY_CROISSANT_P
Hull Strength: 10
Crew: 3-6 Slug (Pirate crew is 3-6 random)
Systems
Optional
- Medbay (1-3)
- Door Control (1-3)
- Cloaking (1-2) [Pirate Light-Cruiser only]
Augmentations
Slug Light-Surveyor / Pirate Light-Surveyor
blueprint: JELLY_CROISSANT_DLC, JELLY_CROISSANT_P_DLC
Hull Strength: 10
Crew: 3-7 Slug (Pirate crew is 3-7 random)
Systems
Optional
- Clone Bay (1-3)
- Mind Control (1-2)
Augmentations

Slug Assault / Pirate Assault
blueprint: JELLY_TRUFFLE, JELLY_TRUFFLE_P
Hull Strength: 11
Crew: 4-7 Slug (Pirate crew is 4-7 random)
Systems
Optional
- Medbay (1-3)
- Door Control (1-3)
- Cloaking (1)
Augmentations
Slug Instigator / Pirate Instigator
blueprint: JELLY_TRUFFLE_DLC, JELLY_TRUFFLE_P_DLC
Hull Strength: 11
Crew: 4-8 Slug (Pirate crew is 4-8 random)
Systems
Optional
- Clone Bay (1-3)
- Door Control (1-2) [Pirate Instigator only]
- Cloaking (1) [Slug Instigator only]
- Mind Control (1-2)
Augmentations
Weapons
These Slug Ships can have any of the following weapons:
- Basic Laser
- Burst Laser Mark I
- Burst Laser Mark II
- Heavy Laser Mark I
- Heavy Laser Mark II
- Artemis Missiles
- Breach Missiles
- Mini Beam
- Halberd Beam
- Glaive Beam
- Pike Beam
- Fire Beam
- Fire Bomb
- Ion Blast
- Ion Blast Mark II
Additional weapons with Advanced Edition Content enabled:
Zoltan Ships
All Zoltan ships (except ones in sector one on easy mode) carry a Zoltan Shield, which impedes ALL weapons, drones, and teleports. Although uncommon, it's not unheard of to see Zoltan working with Engies in the same ship. In a strange twist of irony, Zoltan prefer to arm their ships with ion and beam weapons, though burst lasers, bombs, and weaker missile launchers can also be commonly spotted. Heavy lasers are rarely seen on Zoltan warships.
Strategy: Beam drones cut through the overshield in a jiffy, and don't miss at the same time. Most beams (even fire or anti-bio beams) hit the shield twice when firing. Once the Zoltan Shield is down, a boarding party will easily get rid of the enemy Zoltan crew members. (provided the medbay/clonebay on the enemy ship is down) Another strategy is to get ion weapons since they do double the effect on the Zoltan Shield. The Ion Blast Mk II alone will take the Zoltan Shield down in 12 seconds provided it does not miss. Ion bombs deal 8 damage to the shield and take it down immediately.
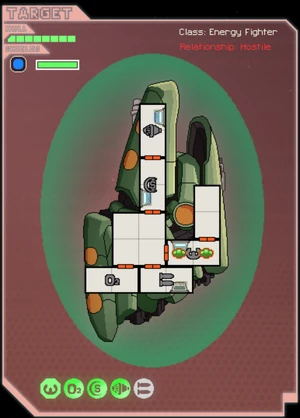
Not counting the ZOLTAN_PEACE (Energy Fighter), the special ship that you encounter at the start of the Zoltan Cruiser unlock series of events (and that later shows up if you choose the correct options).

Energy Fighter / Pirate Fighter
blueprint: ZOLTAN_FIGHTER, ZOLTAN_FIGHTER_P
Hull Strength: 7
Crew: 2-3 Zoltan (Pirate crew is 2-3 random)
Systems
Optional
- Medbay (1-3)
- Door Control (1-3)
Augmentations
Energy Instigator / Pirate Instigator
blueprint: ZOLTAN_FIGHTER_DLC, ZOLTAN_FIGHTER_P_DLC
Hull Strength: 7
Crew: 2-3 Zoltan (Pirate crew is 2-3 random)
Systems
Optional
- Clone Bay (1-3)
- Mind Control (1)
Augmentations
Energy Fighter (Peace)
Unique ship for the Unarmed Zoltan Transport random event. Has no Shields, Weapons, or Zoltan Shield.
blueprint: ZOLTAN_PEACE
Hull Strength: 7
Crew: 2-3 Zoltan
Systems
Optional
- Medbay (1-3)
- Door Control (1-3)

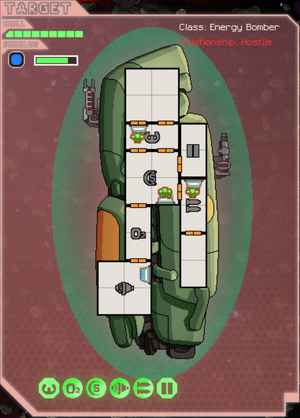
Energy Bomber / Pirate Bomber
blueprint: ZOLTAN_BOMBER
Hull Strength: 7
Crew: 3-6 Zoltan (Pirate crew is 3-6 random)
Systems
Optional
- Drone Control (2-4)
- Medbay (1-3)
- Door Control (1-3)
Augmentations
Energy Hacker / Pirate Hacker
blueprint: ZOLTAN_BOMBER_DLC, ZOLTAN_BOMBER_P_DLC
Hull Strength: 7
Crew: 3-6 Zoltan (Pirate crew is 3-6 random)
Systems
Optional
- Clone Bay (1-3)
- Door Control (1-3)
- Hacking (1-2)
Augmentations
Weapons
These Zoltan Ships can have any of the following weapons:
- Basic Laser
- Burst Laser Mark I
- Burst Laser Mark II
- Burst Laser Mark III
- Heavy Laser Mark I
- Heavy Laser Mark II
- Leto Missiles
- Artemis Missiles
- Hermes Missile
- Mini Beam
- Halberd Beam
- Glaive Beam
- Pike Beam
- Fire Beam
- Ion Blast
- Heavy Ion
- Small Bomb
- Ion Bomb
- Hull Beam
Additional weapons with Advanced Edition Content enabled:
Drones
Zoltan Ships equipped with a Drone Control can have any of the following drones:
Additional drones with Advanced Edition Content enabled: