| Line 12: | Line 12: | ||
| − | <p style="line-height: 15.75pt;"><span lang="EN" style="color: rgb(213, 212, 212); font-family: "Helvetica","sans-serif"; font-size: 10pt; mso-ansi-language: EN;">Enemy ships can have some major systems (Shields, or Weapons) that exceed 8, which is the limit for players. Most commonly, this is seen late game with Rebel AI Assault ships have been seen with 9 or 10 in shields. Crystal ships have also been seen with 10 shields. Slug Assault ships have been seen with 9 in weapons. |
+ | <p style="line-height: 15.75pt;"><span lang="EN" style="color: rgb(213, 212, 212); font-family: "Helvetica","sans-serif"; font-size: 10pt; mso-ansi-language: EN;">Enemy ships can have some major systems (Shields, or Weapons) that exceed 8, which is the limit for players. Most commonly, this is seen late game with Rebel AI Assault ships have been seen with 9 or 10 in shields. Crystal ships have also been seen with 10 shields. Slug Assault ships have been seen with 9 in weapons. </span></p> |
| + | |||
| − | </span></p> |
||
| + | <p style="line-height: 15.75pt;"><span lang="EN" style="color: rgb(213, 212, 212); font-family: "Helvetica","sans-serif"; font-size: 10pt; mso-ansi-language: EN;">Generally enemy ships have a limit to the amount of missiles they use. Confirmed with Basilisk against Mantis Scout. Defense Drones kept taking down missiles and then the light on the enemy weapon remained green forever and the weapon never fired. Limt is unknown.</span></p> |
||
==General Strategies== |
==General Strategies== |
||
Revision as of 00:16, 23 March 2013
In FTL, there are many enemy ships you will encounter, below are different ships and how to fight them.
General information
Most races have three types of ships:
- Scout
- Assault
- Bomber
The Rebels are a notable difference, with their Riggers and Elite Fighters, as well as the Slug Interceptors and Light-Cruisers.
Enemy ships can have some major systems (Shields, or Weapons) that exceed 8, which is the limit for players. Most commonly, this is seen late game with Rebel AI Assault ships have been seen with 9 or 10 in shields. Crystal ships have also been seen with 10 shields. Slug Assault ships have been seen with 9 in weapons.
Generally enemy ships have a limit to the amount of missiles they use. Confirmed with Basilisk against Mantis Scout. Defense Drones kept taking down missiles and then the light on the enemy weapon remained green forever and the weapon never fired. Limt is unknown.
General Strategies
Often, you find that the best all-round weapon in FTL is a simple laser weapon, such as the Dual Lasers or the Burst Laser Mk. 2. This is because:
- Beams can be stopped very easily with only a layer or 2 of shields
- Missiles can be easily shot down by defence drones and can use up your missile storage quickly
- Bombs do no hull damage and use missiles as well.
- While e.g. the Crystal weapons are better than laser weapons, they can be very hard to obtain (and while they consume no missile resource, these projectiles can be shot down by defender drones as well).
However, when combined with Laser weapons, Beam weapons are often extremely effective as they can't miss and can do mass damage easily with the enemy shields down.
Usual targets
Generally, you want to aim at these three locations in an enemy ship:
Sometimes, you can skip these if:
- (Weapons) You have good shields/evasion so the enemy can't/probably can't hit you
- (Shields) You have only missile/bomb weapons
- (Cockpit) You only use boarding (and the opponent is not powering up it's FTL or you're confident that you can take out the cockpit or the engines before they jump)
- (Medbay) You don't care about the usual additional rewards for killing all the crew and just want to destroy the ship or don't have a crew teleporter installed.
Useful information
- Enemies with missile/bomb or drone weapons have a limited supply of these, so if for some reason you're forced into a long fight, and you don't want to jump away from the battle, you only have to deal with limited number of shots from these weapons/limited ammount of drones used (this is generally more relevant in case of on board drones like anti personel, boarding, and repair drones)
- If you're sure that you cannot defeat or disable an enemy ship that wants to jump away to warn the rebel fleet, if you jump away before they do, you don't get the penalty of not stopping them (so the rebel fleet don't get to advance 2 times the normal rate for the next turn). [This needs verification]
- Normally you cannot target weapons at a cloaked enemy ship, and your weapons don't charge while the enemy is cloaked, nor you can see the inside of the ship, however if you have boarders on their ship (be it drone or your crew) the enemy ship stays revealed during their cloak, you can target your weapons, and any weapon that is charged is able to fire at the cloaked vessel, hoewever you still need to overcome the increased dodge rate they have while cloaked (+60%), this means that only beam weapons can hit cloaked ships reliably this way.
Crystal Ships
Crystal ships use crystal weapons and the lockdown bombs, drones, and on a rare occasion, they can have FIVE shields.
Engi Ships
Engi Ships are easily distinguishable with their trademark gray hull and squarish design (see below). A Drone system is always present on Engi ships, always accompanied with at least one active Defense Drone. If a MedBay is present in the ship, then the ship is guarenteed to have MedBot Dispersal, which allows the Engies to take extra beatings during an assault
Strategy: The best way to counter engi ships is with a crew teleporter (and a bomb weapon if the ship has a medbay). Bombing the medbay and sending in a boarding party (Engi ships rarely have anti-personnel drones) will guarentee victory.
Engi Scout
Engi Bomber

Engi Bombers have very crammed rooms, making a beam weapon devestating once shields are taken down.
An Engi Cruiser has:
- A Cockpit
- An Engine room
- A Weapons room
- A Shield room
- An O2 room
- A Drone control room
Federation ships
Federation Scout
They usually don't have any kind of medbay, and only two crewmembers, so they are really easy to board.
Federation Bomber
Strategy: If you have a pike beam, and some sort of weapon to get rid of the shields, you can hit 6 rooms with one laser, as shown below. Note: Federation ships can only be fought against if they are pirates, and thus the colour scheme is not that of the real Federation ships. However, they can be met as friendly ships asking for help.

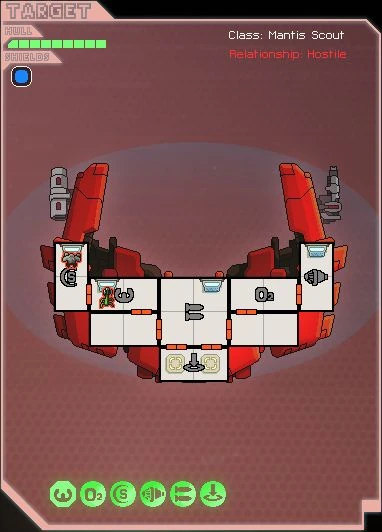
Mantis Ships
Mantis warships are coated (appropriately) in a red hull, and are very symmetrical in room layout. Mantis ships typically carry heavy weapons as well as a crew teleporter (even in pirated Mantis ships). Unlike other ships, Mantis ships are typically not homogenous, often carrying Engi slaves to make up for the Mantis' lack of repairing skill. Rockmen are a less common sight on these ships and Zoltan and Slugs very rarely appear.
Strategy: Mantis boarding parties can be devastating, as they can do so much damage to crew. Unless you have well trained fighters, or an anti-personnel drone, try suffocating the boarding party. It's also advisable to have a defense drone, as mantis ships usually have highly destructive missile weapons. Fire weapons devastate Mantis ships, provided they don't have anyone on board the ship to put out the fires.
If you have a boarding party which has atleast two strong members, it is easy to kill the crew of smaller mantis ships, but it is more challenging, and unless you know what you are doing, and is unadvisable, to board larger mantis ships like the bombers.
Rebel Ships
The rebel ships utilise advanced technology, and are often better than the other ships at their stage.
Elite Rebel Ship
You will encounter this ship if the rebel fleet catches up with you, or at the last sector, The Last Stand, where you will commonly fight these at different beacons. It is recommended to stay away from the rebel fleet in the early stages until you manage to upgrade things like your shields, engines and such. Except for encounters with these ships in The Last Stand, it is generally best to jump away once your FTL is charged, as the pursuing rebel ships provide no reward other than one fuel. Note: Elite Rebel fighters can have TEN in weapon levels.
AI-Controlled Rebel Ships
Automated ships are unmanned ships. This means that they automatically repair systems over time and have no oxygen on board, do note that rooms with hull breaches will not be repaired as putting out fires/repairing hull breaches is a higher repair priority than repairing the subsystem, and the AI ships have no way of repairing said breaches.
Be careful if you're using boarding as a way of taking out some initial systems (e.g. Shields), since you will need an at least level 2 teleporter to be able to teleport 100 health crew members back before suffocating . Rock and Crystal members can last a little longer due to their higher health and respective abilities, thus with these the boarding is survivable even with level 1 teleporter.
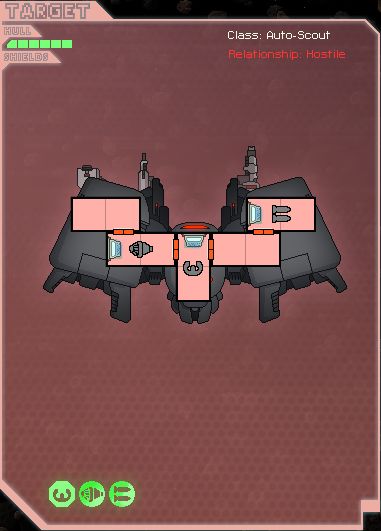
Auto-Scout

The Auto-Scout always has:
- A cockpit.
- Engines.
- A weapon control.
It can have:
It starts with 10 missiles.
Strategy
Auto-Scouts more than make up for their lack of defence and health with a deadly array of weapons, high-power engines, and cloaking. Take advantage of their fraility before they can do any real damage. High shields can be penetrated without misile weapons via ionization.
Auto-Assault
The Auto-Assault always has:
- A cockpit.
- An engine room.
- A weapons room.
- Shields.
Note: Sometimes, Auto-Assault ships may have FIVE shields. It is pracitally impossible to penetrate the shields with just one of the non-missile weapons. The five shields may be a bug in the game, but this may be why the developers gave missiles 5 shield piercing in the game.
It can have:
It starts with 10 missiles.
It can have either of the following drones:
Weapons
Both ships can have either of the following weapons:
- Defense Laser Mark I
- Burst Laser Mark I
- Burst Laser Mark II
- Burst Laser Mark III
- Heavy Laser Mark I
- Heavy Laser Mark II
- Leto Missiles
- Artemis Missiles
- Hermes Missile
- Mini Beam
- Halberd Beam
- Small Bomb
- Fire Bomb
- Ion Bomb
- Ion Blast
- Heavy Ion
- Ion Blast Mark II
Rock Ships
Rock ships often rely on their missile and beam weaponry. This can be easily negated though, by having a defense drone as it effectively renders missiles useless, whereas the beams practically won't even touch you if you have a good shield (Level 2 is often good, as it stops everything short of a Glaive Beam).They are equiped with Rock plating augmentation.
Rock Scout
Rock Fighter
Rock Assault
Rock Assault (Elite)
Slug Ships
Slug Interceptor
- Slug Interceptors have no doors connecting the oxygen or engine system, so killing the crew on harmless versions should be extremely easy, as you can destroy the engines to prevent them from jumping away, then the oxygen to kill the crew - slowly, that is.
Slug Light-Cruiser
Slug Assault
Some Slug Assault ships can have NINE for weapons.
Zoltan Ships
All Zoltan ships (except ones in sector one on easy mode) carry a Zoltan Shield, which impedes ALL weapons, drones, and teleports. Although uncommon, it's not unheard of to see Zoltan working with Engies in the same ship. Zoltan prefer to arm their ships with ion and beam weapons at every opportunity.
Strategy: Beam drones cut through the overshield in a jiffy, and don't miss at the same time. Most beams (even fire or anti-bio beams) hit the shield twice when firing. Once the Zoltan Shield is down, a boarding party will easily get rid of the enemy zoltan crew members. (provided the medbay on the enemy ship is down) Another strategy is to get ion weapons since they do double the effect on the Zoltan Shield. The Ion Blast Mk II alone will take the Zoltan Shield down in 12 seconds provided it does not miss. Ion bombs deal 8 damage to the shield and take it down immediately.
Note: Beams do two room damage effect on Zoltan Shields whereever you fire them.
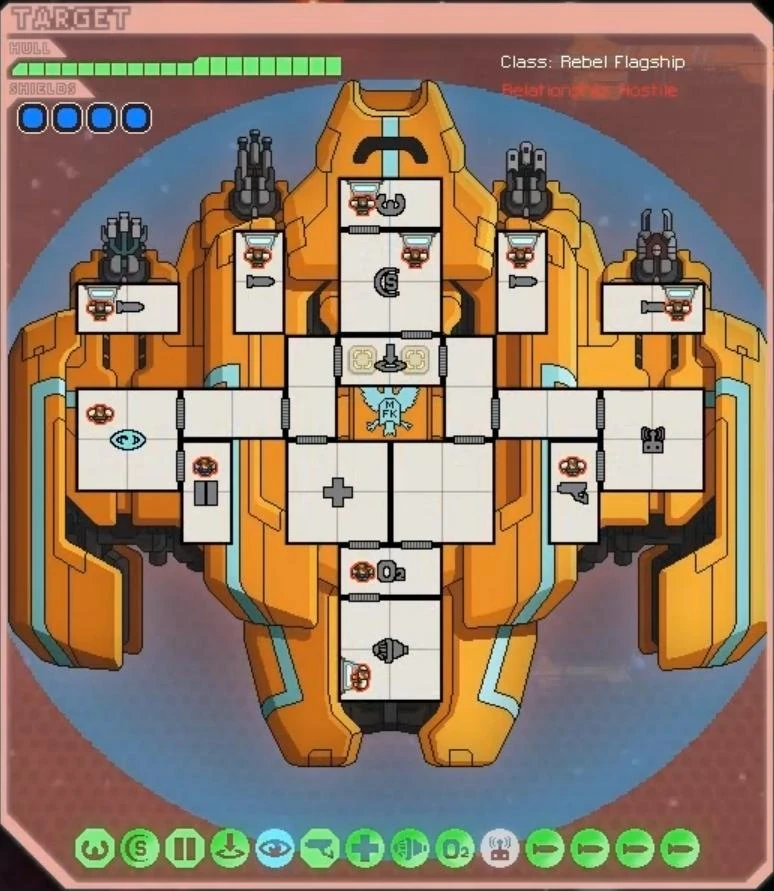
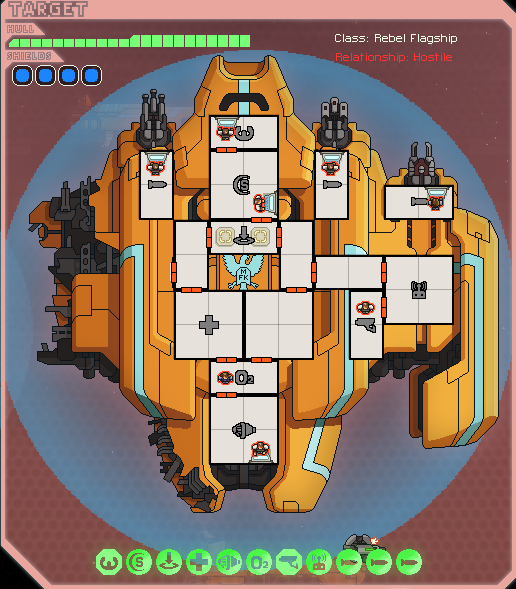
The Rebel Flagship
- Main article: The Rebel Flagship
The Rebel Flagship is the final ship you can encounter in a play through of Faster Than Light. This ship is also most likely the hardest ship you will encounter in Faster Than Light. It has three forms, each one meant to be harder than the last. It has 4 layers of shields, high dodge rate, and an individual room for each type of weapon (ion, missile, burst laser and beam) which is separate from the other rooms and can be destroyed. However, there is a crew member in each of these and thus they will be repaired. In its first form, it can cloak itself (loses for 2nd stage), in the second form it has drones (loses these for 3rd stage), and finally in its third form it has a Zoltan shield, it uses its teleporter and shoots between 5 and 10 lasers from apparently nowhere. Upon winning a section from it, a bit of it will be broken off from the ship, starting from the left, then the right and finally the ship is destroyed and you win the game. If you kill all its crew, you will get a message that a powerful AI controls it now. That's bad news: it will now automatically repair systems (rooms with breaches will be not repaired when the AI takes control, so if you use breach bombs in this encounter, the AI taking control may be good news).
General Strategy:
It helps greatly to have at least the following:
- Cloaking
- Teleporter
- Lvl. 6+ Weapons with at least 6 or 7 laser bolts or a Mk. 2 Ion blast
- Defense Drone Mk. 1 (practically better than Mk. 2)
- 3 or 4 layers of shields
- Lvl. 6+ engine
You should first kill the human in the missile weapon (the second weapons room from the right) and destroy it with your teleporter. Next, you can do the same for the beam, however it is not required. Do this in all stages, as 1. it is the easiest way to destroy it and 2. the three missiles can easily get past even a Mk. 2 defense drone. Next, just destroy its shields (Mk. 2 Ion blast can remove all layers if set to autofire, assuming it doesn't miss, and it does not cloak before you can permanently disable it's shields) and cloaking, and try to kill some crew while you're at it. Often, they will all go to fix the shields so just wait until there are 2-4 people and launch a barrage at them.
The Final Boss 1st stage
Forms:
First stage
Special Attack: None
Special Defense: The rebel flagship has quite a longlasting cloak. This can make the fight difficult, because it allows him to repair, heal, recharge. It has quite a big crew too, so this can cause some problems getting through.
Strategy: It helps if you view this battle not just as a battle you must win at all cost; but as a preperation step for the next two battles. Although all systems will be repaired between fights, dead crew will remain dead though. Killing all of the crew results in the ship's advanced AI taking over and all systems begin to auto-repair. Be aware that it loses the turret and cloak on the left after the first fight and the turret on the right and drone control after the second fight. This is the only phase where it has each of the triple-turrets. You need 3 shield, at least 30% evasion (estimation) to not die quickly. Defense drones and cloak can help negate damage too.
Another useful strategy if you have a teleporter is to send crewmembers, either two humans or one rock or one mantis generally works, in each of the offensive turrets, killing the crew and destroying the weapon. If you keep all your defensive ablities fully powered during this time, you can avoid most of the incoming damage, and once they are destroyed, he will have no way of damaging your ship (for the first stage), which means you can destroy him without having to worry about his weapons.
Second stage

Second form of the Rebel Flagship
If you emerged victorious from your first battle, the section furthest to the left breaks off, taking away its ability to cloak, its ion weapon the door system, and up to three crew members.
Special Attack: The special attack of the second stage consist of a large squadron of anti-ship drones (around 5-10, mostly beam drones). This special attack can be very destructive if they get through your shields.
Special Defense: The boss has a defense drone deployed during this stage, rendering missiles practically useless (except Pegasus missiles that fires 2 projectiles, or if you have multiple missile systems and you sync up their shots)
Strategy: Despite the weaker special attack, this isn´t an easy stage, however. The defense drone and boarding drone can make life quite hard. Especially since killing the boarding drone, just makes him fire a new one almost immediately (probably causing a new breach too). There are three ways of dealing with the boarding drone:
- Shooting it down with a defense drone
- Having improved blast doors and ignore it until it enters an important room
- Damage the drone facility enough so that it stops moving
The power surge with all the drones can be devastating if you aren't careful. The Anti-ship drones will all fire at once, and can fairly easily get through your shields if you don't evade enough of the shots. If your shields drop to zero even for a fraction of a second, you may get hit by a lot of beam drones all at once. This can be catastrophic. One easy way to protect yourself from this is to activate your cloak with only one power bar. The cloak will wear off shortly before the drones go away (likely not leaving them enough time to hurt you) and will cooldown just in time for you to cloak again for the next power surge. If you use 2 or 3 power bars on the cloak, it will not finish its cooldown in time. This does not work with the laser burst power surge in the third stage, as the surges come too often to cloak for all of them.
Third stage
Special Attack: The special attack of the third stage consists of a burst of laser-like attacks, about 8-9 shots that arrive almost simultaneously, they look like heavy laser blasts but do only 1 damage if get beyond your shields and hit, a well timed use of cloaking is the best way to minimize damage, or highly powered engines, shields, and 1-2 defense drone mark II (this latter is quite intensive on power requirement, but if you are in a bind this way can negate most of the damage if not all).
Special Defense: A zoltan shield that takes 12 damage. Sometimes if it's Zoltan shield is down, after a power surge it does not use it's special attack but recharges it's Zoltan shields to full. Restoring it's Zoltan shields will destroy all boarding drones (unpowered boarding drones may be unaffected), however boarding parties are unaffected, aside from the fact of you not being able teleport them out.
Strategy: The third stage, the attacks of the rebel ship are the strongest. Where the previous rounds a defensive strategy may have worked, the best way to deal with this stage is to deal as much damage as quickly as possible. The AI usually uses its teleporter to board you straight away, so be prepared to deal with that before you start the third stage fight (they are human boarders, and arrive only 2 at a time, so if you have trained boarders you should either wait with them on your own ship to catch the enemy boarders, or board their ship before they can do yours, and take out their teleporter, or sometimes they don't even board you if you've already boarded them).