m (Reverted edits by 67.249.204.175 (talk | block) to last version by 77.2.83.38) |
(→Pulsar: ion damage formula) |
||
| (22 intermediate revisions by 6 users not shown) | |||
| Line 1: | Line 1: | ||
[[File:HazardIcon.png|thumb|Hazards Icon with [http://ftl.wikia.com/wiki/Augmentations#Long-Range_Scanners Long Range Sensors]]] |
[[File:HazardIcon.png|thumb|Hazards Icon with [http://ftl.wikia.com/wiki/Augmentations#Long-Range_Scanners Long Range Sensors]]] |
||
| − | + | When arriving at a [[beacon]], there will sometimes be an '''environmental hazard''' present, which usually impedes your ship in some fashion. Enemy ships will receive the exact same effects (with some exceptions, such as ASBs). |
|
==Class-M Red Giant Star== |
==Class-M Red Giant Star== |
||
| Line 8: | Line 8: | ||
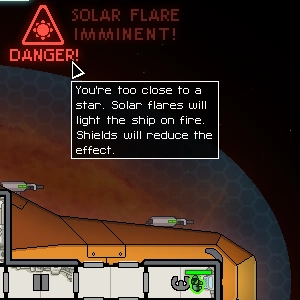
''Beacon coordinates appear to be very close to a nearby sun.'' |
''Beacon coordinates appear to be very close to a nearby sun.'' |
||
| + | Solar flares periodically light fires on your ship and any enemy ship, with a chance to also damage hull and systems in the affected rooms. The solar flare triggers randomly every 28--34 seconds, with a warning 5 seconds beforehand. |
||
| − | The game will warn you with a "Solar flare imminent" message before it happens, upon which random [[fires]] will be set in the ship, dealing damage to a system if it spawns in a room with a system in it, and potentially dealing hull damage at the same time if the system is destroyed. While [[Shields]] are said to reduce the effect, even max shields don't entirely negate it. |
||
| + | |||
| + | Having any active shields reduces the effect. With shields up, you will take 0 or 1 hull and system damage, with at least 1 fire and occasionally 2 fires. Without shields, you will take up to 2 hull and system damage, with 2--5 fires (averaging 3 fires). |
||
| + | |||
| + | Zoltan Shields do not protect against the solar flare, and having additional shield layers makes no difference. |
||
See [[Red Giant Events]]. |
See [[Red Giant Events]]. |
||
<br style="clear:both" /> |
<br style="clear:both" /> |
||
| + | |||
==Nebula== |
==Nebula== |
||
[[File:HazardNebula.png|thumb|200px|Nebula.]] |
[[File:HazardNebula.png|thumb|200px|Nebula.]] |
||
| Line 18: | Line 23: | ||
''The nebula here will make fleet pursuit slower but will disrupt your sensors.'' |
''The nebula here will make fleet pursuit slower but will disrupt your sensors.'' |
||
| + | Nebulas disable your [[Sensors]]. [[Slug|Slugs']] telepathic abilities will allow you to see enemy crew regardless. |
||
| − | Nebula disrupt use of the [[Sensors]] sub-system. The [[Slug|Slugs']] telepathic abilities give them an advantage here. Some [[Sectors#Nebula|sectors]] are completely covered with nebula, in other sectors a section of the beacons on the FTL map may be covered by nebula. Whether or not the AI of the game is impeded by missing sensors is unknown as they attack random areas inside and outside nebulas. The speed with which the rebels chase you is reduced while inside a nebula - by 50% outside of nebula sectors and by 30% inside nebula sectors. |
||
| − | Nebulas do not count as environmental hazards for the purpose of the [[Ship_Achievements/Tactical_Approach|Tactical Approach]] achievement. |
+ | The speed with which the Rebels chase you is reduced while inside a nebula, by 50% in most sectors and by 20% inside [[Sectors#Nebula|nebula sectors]]. Nebulas do not count as environmental hazards for the purpose of the [[Ship_Achievements/Tactical_Approach|Tactical Approach]] achievement. |
See [[Nebula Events]]. |
See [[Nebula Events]]. |
||
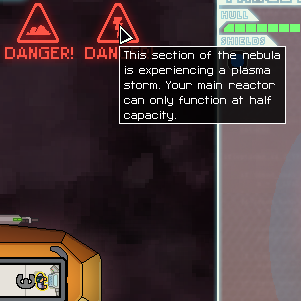
| Line 29: | Line 34: | ||
''This section of the nebula is experiencing an ion storm.'' |
''This section of the nebula is experiencing an ion storm.'' |
||
| + | Some nebula beacons contain ion storms (also called plasma storms), which make your reactor run at half-efficiency (rounded up). Zoltan power is not affected, nor is power from the [[Backup Battery]]. You will need to use your remaining power efficiently. |
||
| − | Inside large clouds, nebula hazards also have a chance of being paired with a plasma or an ion storm, which makes your reactor run at half-efficiency (rounded up). In these, it is best to shut off all non-essential [[systems]] (such as the [[medbay]] - just keep in mind that depowered [[Clone Bay|clone bay]] does not work without the [[Augmentations#Backup DNA Bank|backup DNA bank]] augmentation) so that there is enough power for the [[Weapon Control|weapons]]/[[Drone Control|drones]] if you intend to fight, or for the [[engines]] and [[shields]] if you intend to run or leave if the beacon is empty. |
||
| + | Power will be removed automatically from systems as you arrive, potentially causing you to lose shields and take damage from an enemy drone. You can prevent this by leaving enough spare power in the reactor before you jump. |
||
| − | Oxygen may be automatically depowered in a plasma storm so upon exit be sure to power it up. Typically your crew can survive a moderate-length battle without active o2, letting you to free up that one critical bit of energy, but watch out if the battle draws longer or if your enemy has a realistic chance of further harming your life support! |
||
| − | + | Enemy ships' reactors are also halved, which can make the battle easier. They can re-allocate power when systems are ionised or damaged, potentially doubling their shields or deploying a new weapon or drone mid-battle. If the current enemy power usage is favourable to you, consider attacking only rooms that do not use power (such as piloting). |
|
| + | When the Rebel fleet overtakes a nebula beacon, it will '''always''' have an ion storm, even if it didn't have one beforehand. The exception is the exit beacon: nebula exit beacons have no environmental hazards. |
||
| − | The [[Battery_Backup|battery backup]] subsystem and the power from Zoltan crew members are unaffected by plasma storms, making them very useful in nebula zones. |
||
| − | |||
| − | Note: <s>Ion Storms will instantly drain player weapon charges on arrival, rather than let them fall over time.</s> (No longer in Advanced Edition) |
||
See [[Plasma Storm Events]]. |
See [[Plasma Storm Events]]. |
||
| − | [[Category:Guides]] |
||
==Asteroid Field== |
==Asteroid Field== |
||
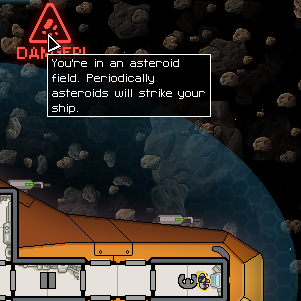
| Line 47: | Line 49: | ||
''Asteroid field detected in this location.'' |
''Asteroid field detected in this location.'' |
||
| − | Asteroids will periodically fly towards your ship. |
+ | Asteroids will periodically fly towards your ship. Unless dodged, they will either knock down a single shield layer or deal 1 point of hull and system damage to a random room on the ship. They have a small chance to cause a fire or a breach. They have the same effect on enemy ships. |
| − | The interval between each asteroid is random |
+ | The interval between each asteroid is random, but scales according to '''your ship's''' shield system level: asteroids will come more frequently if your shields are highly upgraded. This potentially makes ion-heavy enemy weapons extremely dangerous in an asteroid field, since the asteroid frequency will not decrease when your shields are down. Nevertheless, shield upgrades generally make your ship much safer in asteroid fields. |
| + | Defense drones can shoot down asteroids, but will often fail to hit them before the asteroid takes down a shield layer. |
||
| − | Asteroid fields are a great place to level up your crew in shields and evasion. This experience can only be gained during battle, even though asteroids will continue flying by or impacting your shields afterwards. |
||
| + | |||
| + | Your crew can gain skill in shields and evasion from asteroids. Skill can only be gained while you are in combat with an enemy ship, even though the asteroids keep coming after the battle. |
||
See [[Asteroid Field Events]]. |
See [[Asteroid Field Events]]. |
||
| Line 62: | Line 66: | ||
You can encounter a pulsar only if you play with [[Advanced Edition]] content on. |
You can encounter a pulsar only if you play with [[Advanced Edition]] content on. |
||
| + | An ion pulse will occur every 11--18 seconds, with a warning 5 seconds beforehand. The ion pulse will randomly ionise 2 systems on your ship, and 2 systems on the enemy ship. The amount of ion damage depends on the amount of power in the system. The formula is: ion damage = 1 + 0.5(system power), rounded down. |
||
| − | The game will warn you of an ion pulse before a pulse from the star, just like the solar flare from the Red giant or the target lock on the Planet-side battery. The pulse causes 2 or 3 ion damage on one system, shields first if they are up, and 1 ion damage to another random system even if they are. If the shields are down, all ion damage will be done to a second random system instead. Hitting pulsating star beacons early-game can be deadly, as your shields are still very low, thus it is best to finish battles as quickly as possible here. If you are fighting an enemy ship, they will also be affected. The star will continue to pulse even after combat, so it is suggested you leave right before another pulse hits. Ion damage will carry over to the next beacon, so be cautious where you jump. |
||
| + | {| class = "article-table" |
||
| + | !Power in the system |
||
| + | !Amount of ion damage |
||
| + | |- |
||
| + | |0 |
||
| + | |1 |
||
| + | |- |
||
| + | |1 |
||
| + | |1 |
||
| + | |- |
||
| + | |2 |
||
| + | |2 |
||
| + | |- |
||
| + | |3 |
||
| + | |2 |
||
| + | |- |
||
| + | |4 |
||
| + | |3 |
||
| + | |- |
||
| + | |5 |
||
| + | |3 |
||
| + | |- |
||
| + | |6 |
||
| + | |4 |
||
| + | |- |
||
| + | |7 |
||
| + | |4 |
||
| + | |- |
||
| + | |8 |
||
| + | |5 |
||
| + | |} |
||
| + | Subsystems will take ion damage according to their system level, including the temporary upgrade level from crew manning them. For example, level 3 doors will take 3 ion damage when crew are manning them. |
||
| − | Since it is ion damage, sporting a [[Augmentations#Zoltan_Shield|Zoltan Shield]] - which takes double ion damage - is particularly ineffective, and it will be taken out in one hit; another good reason to stay away from pulsars when using a [[Zoltan Cruiser|Zoltan ship]] layout. |
||
| + | Shields will always be ionised if they are powered. If shields are unpowered, they can still be ionised randomly, but will only take 1 ion damage. Therefore it may be tactically useful to unpower your shields just before the pulse hits, reducing their downtime. |
||
| − | Some drones are particularly useful at this hazard. Attack drones can often deal enormous damage once enemy shields are down, and an anti-drone unit provides valuable insurance. The [[Drone_Control#Shield_Overcharger|Shield Overcharger]] is surprisingly useful. Even one bar of supershield will absorb an entire star pulse, protecting your shields and systems. |
||
| + | |||
| + | The [[Augmentations|Reverse Ion Field]] augment gives a 50% chance to prevent all ion damage from a pulse, or 100% if you have two of them. Stationing Zoltan crew in a system room can at least partially protect systems (but not subsystems). |
||
| + | |||
| + | Zoltan Shields completely absorb the ion pulse, taking 3 damage and protecting all systems. A single layer of Zoltan Shield is enough to block a pulse, making the [[Drone_Control#Shield_Overcharger|Shield Overcharger]] drone very effective. However, a Zoltan Shield will '''not''' protect a ship that lacks a shield system (the ion pulse will ignore the Zoltan Shield); this is likely a bug. |
||
==Anti-Ship Battery (ASB)== |
==Anti-Ship Battery (ASB)== |
||
| Line 72: | Line 111: | ||
[[File:ASB Target Locked.jpg|right|205x205px]] |
[[File:ASB Target Locked.jpg|right|205x205px]] |
||
| ⚫ | ASBs periodically fire a shield-piercing 3-damage shot at your ship, hitting a random room, and always causing a hull breach. These shots can be evaded but cannot be shot down. ASB shots bypass [[Zoltan shield|Zoltan Shields]]: the Zoltan shield takes no damage, but the ship will take hull and system damage. |
||
| ⚫ | |||
| − | |||
| ⚫ | |||
| − | |||
| − | ASBs are fairly rare and often avoidable, but encountering them at any point in the game can be extremely dangerous. When you have few crew or inexperienced repairmen, it is easy to get bogged down with repairing the breaches and systems. The hull damage over time is not to be underestimated; 10 shots will take down a fully-repaired ship. Since the damage is unblockable, escaping from this hazard speedily should be your first priority. |
||
| − | + | Although many shots will be animated firing at you during this hazard, most are harmless and purely for cosmetic effect. You receive a warning 15--20 seconds after the battle starts, and the "real" ASB shot appears 5--10 seconds later. This cycle continues indefinitely until you escape. |
|
| ⚫ | |||
| − | [[File:Friendly_PSB.jpg|right|205x205px]] |
||
| − | Planet-side Batteries are present in [[Rebel Controlled Sector|Rebel Controlled sectors]], making them even more deadly. |
||
| ⚫ | |||
| ⚫ | If you |
||
| ⚫ | |||
| ⚫ | |||
[[Category:Guides]] |
[[Category:Guides]] |
||
Revision as of 13:37, 16 July 2019

Hazards Icon with Long Range Sensors
When arriving at a beacon, there will sometimes be an environmental hazard present, which usually impedes your ship in some fashion. Enemy ships will receive the exact same effects (with some exceptions, such as ASBs).
Class-M Red Giant Star
Giant red star.
Beacon coordinates appear to be very close to a nearby sun.
Solar flares periodically light fires on your ship and any enemy ship, with a chance to also damage hull and systems in the affected rooms. The solar flare triggers randomly every 28--34 seconds, with a warning 5 seconds beforehand.
Having any active shields reduces the effect. With shields up, you will take 0 or 1 hull and system damage, with at least 1 fire and occasionally 2 fires. Without shields, you will take up to 2 hull and system damage, with 2--5 fires (averaging 3 fires).
Zoltan Shields do not protect against the solar flare, and having additional shield layers makes no difference.
See Red Giant Events.
Nebula

Nebula.
The nebula here will make fleet pursuit slower but will disrupt your sensors.
Nebulas disable your Sensors. Slugs' telepathic abilities will allow you to see enemy crew regardless.
The speed with which the Rebels chase you is reduced while inside a nebula, by 50% in most sectors and by 20% inside nebula sectors. Nebulas do not count as environmental hazards for the purpose of the Tactical Approach achievement.
See Nebula Events.
Plasma/ion Storm
Plasma storm.
This section of the nebula is experiencing an ion storm.
Some nebula beacons contain ion storms (also called plasma storms), which make your reactor run at half-efficiency (rounded up). Zoltan power is not affected, nor is power from the Backup Battery. You will need to use your remaining power efficiently.
Power will be removed automatically from systems as you arrive, potentially causing you to lose shields and take damage from an enemy drone. You can prevent this by leaving enough spare power in the reactor before you jump.
Enemy ships' reactors are also halved, which can make the battle easier. They can re-allocate power when systems are ionised or damaged, potentially doubling their shields or deploying a new weapon or drone mid-battle. If the current enemy power usage is favourable to you, consider attacking only rooms that do not use power (such as piloting).
When the Rebel fleet overtakes a nebula beacon, it will always have an ion storm, even if it didn't have one beforehand. The exception is the exit beacon: nebula exit beacons have no environmental hazards.
See Plasma Storm Events.
Asteroid Field

Asteroid field.
Asteroid field detected in this location.
Asteroids will periodically fly towards your ship. Unless dodged, they will either knock down a single shield layer or deal 1 point of hull and system damage to a random room on the ship. They have a small chance to cause a fire or a breach. They have the same effect on enemy ships.
The interval between each asteroid is random, but scales according to your ship's shield system level: asteroids will come more frequently if your shields are highly upgraded. This potentially makes ion-heavy enemy weapons extremely dangerous in an asteroid field, since the asteroid frequency will not decrease when your shields are down. Nevertheless, shield upgrades generally make your ship much safer in asteroid fields.
Defense drones can shoot down asteroids, but will often fail to hit them before the asteroid takes down a shield layer.
Your crew can gain skill in shields and evasion from asteroids. Skill can only be gained while you are in combat with an enemy ship, even though the asteroids keep coming after the battle.
Pulsar

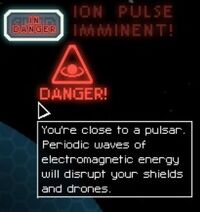
A pulsar is flooding this area with dangerous electromagnetic forces.
You can encounter a pulsar only if you play with Advanced Edition content on.
An ion pulse will occur every 11--18 seconds, with a warning 5 seconds beforehand. The ion pulse will randomly ionise 2 systems on your ship, and 2 systems on the enemy ship. The amount of ion damage depends on the amount of power in the system. The formula is: ion damage = 1 + 0.5(system power), rounded down.
| Power in the system | Amount of ion damage |
|---|---|
| 0 | 1 |
| 1 | 1 |
| 2 | 2 |
| 3 | 2 |
| 4 | 3 |
| 5 | 3 |
| 6 | 4 |
| 7 | 4 |
| 8 | 5 |
Subsystems will take ion damage according to their system level, including the temporary upgrade level from crew manning them. For example, level 3 doors will take 3 ion damage when crew are manning them.
Shields will always be ionised if they are powered. If shields are unpowered, they can still be ionised randomly, but will only take 1 ion damage. Therefore it may be tactically useful to unpower your shields just before the pulse hits, reducing their downtime.
The Reverse Ion Field augment gives a 50% chance to prevent all ion damage from a pulse, or 100% if you have two of them. Stationing Zoltan crew in a system room can at least partially protect systems (but not subsystems).
Zoltan Shields completely absorb the ion pulse, taking 3 damage and protecting all systems. A single layer of Zoltan Shield is enough to block a pulse, making the Shield Overcharger drone very effective. However, a Zoltan Shield will not protect a ship that lacks a shield system (the ion pulse will ignore the Zoltan Shield); this is likely a bug.
Anti-Ship Battery (ASB)
Planet-side anti-ship batteries are detected in this system.
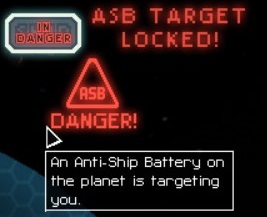
ASBs periodically fire a shield-piercing 3-damage shot at your ship, hitting a random room, and always causing a hull breach. These shots can be evaded but cannot be shot down. ASB shots bypass Zoltan Shields: the Zoltan shield takes no damage, but the ship will take hull and system damage.
Although many shots will be animated firing at you during this hazard, most are harmless and purely for cosmetic effect. You receive a warning 15--20 seconds after the battle starts, and the "real" ASB shot appears 5--10 seconds later. This cycle continues indefinitely until you escape.
If you are overtaken by the Rebel Fleet, an ASB will always be present, with two exceptions: they don't appear if you are at a nebula beacon, or at the exit beacon while playing on easy mode.
Friendly ASBs can be found attacking enemy ships during rare events, mostly in Abandoned Sectors.
ASBs are not considered an Environmental Hazard for the Stealth Cruiser achievement Tactical Approach.