Tags: Visual edit apiedit |
Tags: Visual edit apiedit |
||
| Line 198: | Line 198: | ||
[[File:Teleporter.png|thumb|180px]]''Allows you to send your crew-members to board enemy vessels.'' |
[[File:Teleporter.png|thumb|180px]]''Allows you to send your crew-members to board enemy vessels.'' |
||
| − | This system allows you to send crewmen to other ships to damage their systems and kill their crew. 20 seconds recharge time. Upgrade to reduce the time to 15 or even 10 seconds. Crewmen must be standing still in the teleporter room to be sent. < |
+ | This system allows you to send crewmen to other ships to damage their systems and kill their crew. 20 seconds recharge time. Upgrade to reduce the time to 15 or even 10 seconds. Crewmen must be standing still in the teleporter room to be sent. <slash> Able to retract 4 crewmen if they are standing in a 2x2 room, although crew trying to break down doors will not be teleported.<slash> It is now possible to recall any amount of crew so long as they are standing in the same room, transferring crew through a room with your other crew is one such way to break the limit of 4. You cannot pull enemies onto your ship unless they are [[Mind Control|mind controlled]], however boarders aboard your [[Ships|ship]] from a previous fight '''can''' be pulled to an enemy ship. Works through normal shields. |
* Teleporters are used in some [[Random Events|events]] ([[Blue Options]]). |
* Teleporters are used in some [[Random Events|events]] ([[Blue Options]]). |
||
Revision as of 04:00, 26 February 2017
Template:SeeAlso
Systems and Subsystems play a key strategic element in FTL: Faster Than Light. Each ship contains Engines, Piloting, Oxygen, and Weapons as the most basic systems, as well as almost all having Doors, Shields, a Medbay and Sensors pre-installed, with a number of other, rarer systems available for installation, such as Cloaking, Drone Control and Teleporting. Each system occupies one room on the ship, with more important ones requiring 2x2 tiles instead of 1x2, and every system requires one reactor bar for each available stage of power.
Below is a table of all systems and their basic properties.
The Systems are organized by how they appear in the Ship Selection Screen.
| System | Type | Manned Bonus? | Max Power | Cost |
|---|---|---|---|---|
| Main System | Yes | 8 | 125 | |
| Main System | Yes | 8 | - | |
| Main System | No | 3 | - | |
| Main System | Yes | 8 | - | |
| Main System | No | 8 | 75/85 [1] | |
| Main System | No | 3 | 50 | |
| Subsystem | Yes | 3 | - | |
| Subsystem | Yes | 3-4 [2] | 40 | |
| Subsystem | Yes | 3-4 [2] | 60 | |
| Subsystem | No | 2 | 35 | |
| Main System | No | 3 | 90 | |
| Main System | No | 3 | 150 | |
| Main System | No | 4 | - | |
| Main System | No | 4 | - | |
| Main System | No | 3 | 50 | |
| Main System | No | 3 | 75 | |
| Main System | No | 3 | 80 |
- ↑ Drone Control price varies based on which drone comes with it. If purchased with a System Repair, the cost is 75
 . If purchased with a Combat/Defense Drone, the cost is 85 .
- ↑ 2.0 2.1 Manning the Doors or Sensors notches it up a power level, to a max power of 4 (3 upgrades max + 1 manned)
- ↑ 3.0 3.1 3.2 3.3 3.4 Only available with Advanced Edition content enabled.
There are two types of systems: Main systems and subsystems. Systems require power to function taken from your reactor's total capacity. Subsystems do not require power and receive all the benefits of their current upgrade level unless damaged or crippled by the enemy or the environment. You can have up to 8 systems and 4 subsystems (all subsystems) installed.
As seen in the above table, some systems have benefits from being manned. This means that the given system receives a bonus to its respective abilities whenever a crew member is stationary in the room. This bonus is increased when crew members rank up in the respective skills. However this isn't the case for the Doors or Sensors in Advanced Edition, as there is no skill associated with those systems, and instead the benefit from being manned is to notch up the power level of the system by 1.
Each system can only be upgraded to a limit. When it is fully upgraded, it will have the maximum power amount as specified in the above table.
No ship will have all available Systems and Subsystems installed when starting a new game. The ones that come closest are the Engi C, Federation C, Zoltan C, Mantis B, and Crystal B, each with ten total (maximum is twelve Systems/Subsystems). To install a new system, it must be bought in the Store at the cost given in the above table.
Main Systems
 Shields

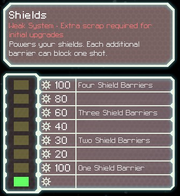
Powers your shields. Each additional barrier can block one shot
- Sustains up to 4 damage-absorbing barriers around your ship
- Each barrier blocks one shot regardless of the shot's damage
- Beams can partially pierce shields losing 1 point of damage per barrier
- Missiles and bombs bypass all shields.
- Some other weapons are also capable of bypassing 1 layer of shields, most notably Crystal weaponry.
- Ion weapons apply full ion damage to shield system, and can stack; this removes multiple barriers.
- Upgrading will increase your barrier count by 1 for every 2 bars of reactor energy.
- Manning increases shield recharge (10->20->30%, depending on the crew member's level of experience).
Engines

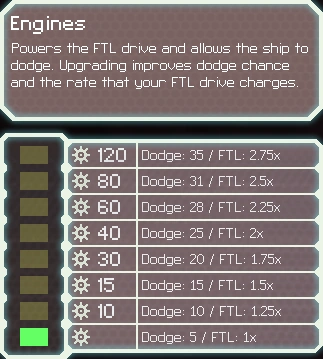
Powers the FTL drive and allows the ship to dodge. Upgrading improves dodge chance and the rate that your FTL drive charges.
- Upgrading improves evasion, and the rate that your FTL drive charges
- Manning increases evasion (5->7->10%, depending on the crew member's level of experience).
- Upgraded Engines are used in some events (Blue Options).
- Used to outrun attackers and evade combat.
- Unless your helm is operational and either manned or upgraded, your evasion will remain at 0% regardless of engine upgrades.
Oxygen/Life Support

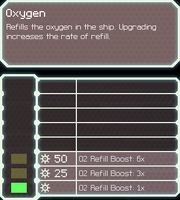
Refills the oxygen in the ship. Upgrading increases the rate of refill.
- Replenishes the ship's oxygen supply.
- The "O2 LOW!" warning appears when the total oxygen percentage on the ship drops below 25%. To take care of the problem:
- Repair the Oxygen/Life Support system.
- Repair any hull breaches.
- Close any open airlocks, and doors leading to rooms that have Lanius in them.
- Make sure Oxygen/Life Support is powered up .
- The "O2 LOW!" warning appears when the total oxygen percentage on the ship drops below 25%. To take care of the problem:
- Crew oxygen deprivation appears when the total oxygen percentage drops below 5% or when standing in pink rooms with hazard stripes (indicating dangerously low O2 levels).
- Upgrading increases the rate of refill.
- At level 2 the oxygen refills faster than a Lanius drains it; therefore, if you have a Lanius crew it is worthwhile thinking of upgrading oxygen so everyone can enter. It also refills fast enough to counteract the O2 drain from level 3 hacking.
- At level 3 your oxygen refill rate actually exceeds the loss from a breach, so if you suffer a breach, open the surrounding doors and power up your support system.
- Upgraded Oxygen/Life Support is used in some events (Blue Options).
- Helps prevent your crew from slowly suffocating during a slug sabotage event.
Weapon Control
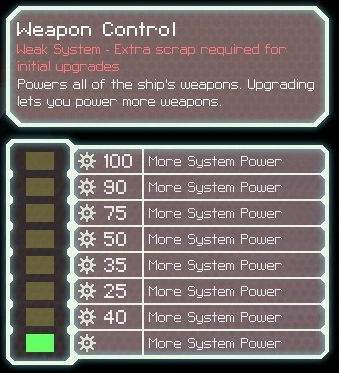
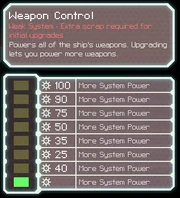
Powers all of the ship's weapons. Upgrading lets you power more weapons.
- Click on a weapon to charge and fire.
- Weapons can also be activated/charged by pressing the corresponding (1-4) key.
- If already activated/charging a second click or press will activate targeting.
- Upgrading lets you power more weapons.
- Manning reduces charge time (10%->15%->20% depending on the crew member's level of experience).
- Under damage, weapons deactivate right to left. Weapon slot 2 will deactivate before weapon slot 1. Therefore put charge weapons in weapon slot 1, so you are less likely to lose their charge bonus.
- Upgraded Weapons are used in some events (Blue Options).
- Gives the ability to scare some pirates before they attack (they give you some of their goods).
Drone Control
- Powers all of the ship's drones.
- Drones are automated robots that each perform a different task.
- Activating a drone is done in a similar way as activating weapons, by clicking on or pressing the key (5-7).
- Activating a drone will power it and, if the drone is not already deployed, will spend one drone part to deploy the drone.
- The drone will stay active until it is destroyed, its system is too damaged to power it, or you deactivate it.
- External and boarding drones are lost when jumping to a new system and have to be redeployed at each new location or encounter, though a Drone Recovery Arm lets you recover the drone parts of external drones.
- Crew drones stay on the ship and only need to be redeployed when destroyed.
- Upgrading lets you power more drones simultaneously (although you can have multiple deployed and only have one powered at a time, switching power as necessary).
- Most playable ships have 2 slots for Drone Schematics. All Engi ships and Stealth C have 3 slots. Enemies can have up to 4 active drones (Rebel Rigger, Rebel Disruptor, the Flagship, and Engi ships).
- Drones that fly around a ship can be shot down by enemy fire if they are in direct line of fire, or can be destroyed by colliding with asteroids. Your weapons cannot hit your own drones and your defense drones cannot shot down each other with their weapons.
- Crew and boarding drones can be damaged and destroyed by hostile crew; however, they take halved damage from any weapons, asteroids, or Zoltan explosion.
- If a drone is destroyed, there is a 10 second delay before it can be deployed again (costing another part).
- Drone Control system can be used as a blue option in the Pirate salesman event.
- Installed drones can be used as a blue option in some events.
- External drones hit by an ion shot are stunned for 5 seconds for each ion damage. Each second of stun after the first, they have a 15% chance to be destroyed.
Medbay

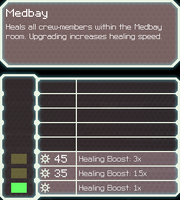
Heals all crew-members within the Medbay room. Upgrading increases healing speed.
- Heals crew members standing inside.
- Can only heal three standing crew members at a time (Excluding the Nisos, the DA-SR 12 and others which only have two sections for healing). You can heal any number of crew members if you order them to pass through the Med Bay, since they are healed while in the area of the room.
- The Engi Med-bot Dispersal augment allows healing outside of the medbay, although at a decreased rate. This requires the medbay to be powered to function.
- If the medbay is in vacuum, powering it will keep crew inside from taking further damage from lack of oxygen.
- Upgrading increases healing speed.
- Upgrading the Medbay won't affect the Engi Med-bot Dispersal augmentation.
- Upgraded Medbay is used in some events (Blue Options), notably some that allow gaining new crew or avoiding losing crew.
- An upgraded Medbay is powerful enough to heal crew members when there is no oxygen.
Crew Teleporter

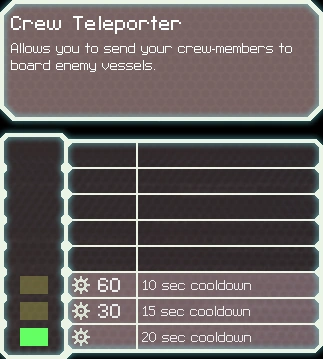
Allows you to send your crew-members to board enemy vessels.
This system allows you to send crewmen to other ships to damage their systems and kill their crew. 20 seconds recharge time. Upgrade to reduce the time to 15 or even 10 seconds. Crewmen must be standing still in the teleporter room to be sent. <slash> Able to retract 4 crewmen if they are standing in a 2x2 room, although crew trying to break down doors will not be teleported.<slash> It is now possible to recall any amount of crew so long as they are standing in the same room, transferring crew through a room with your other crew is one such way to break the limit of 4. You cannot pull enemies onto your ship unless they are mind controlled, however boarders aboard your ship from a previous fight can be pulled to an enemy ship. Works through normal shields.
- Teleporters are used in some events (Blue Options).
- You can use teleporters to free prisoners aboard slaver vessels, this can give you a free crewmate. You can still gain a crew member as usual during the same slaver fight.
- A teleporter and an upgraded medbay is required to unlock the Mantis Cruiser.
Used in some events (Blue Options).
Note: While the teleporter works through shields, it does not work through Zoltan shields, unless you have the Zoltan Shield Bypass Augment. Some events specifically call for the boarding of your ship, during those events, it will claim the enemy has a Zoltan Shield Bypass if you so happen to have a Zoltan shield.
Cloaking


Cloaks the ship, adding 60 to your evasion and preventing the enemy ship from locking on with their weapons.
- Enemy weapons don't charge while the cloak is active.
- Enemies can't teleport onto or off of a cloaked ship.
- Enemy Hacking, Boarding and Intruder drones hold position while cloak is active and continue when cloak finishes.
- Using higher ranks, incurs a longer cooldown.
- Used in some events (Blue Options).
Artillery Beam
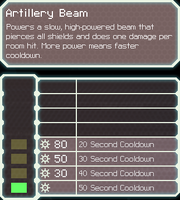
(Federation Cruiser only)
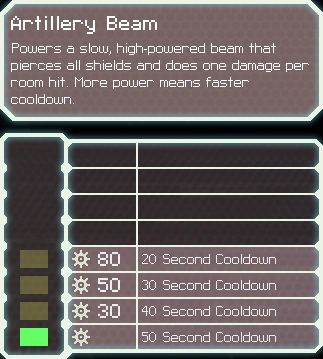
Powers a slow, high-powered beam that pierces all shields and does one damage per room hit. More power means faster cooldown.
- Installed on the Federation Cruisers The Osprey (Layout A) and Nisos (Layout B).
- Automatically fires when powered.
- Powering off drains charge quickly.
- Upgrading means faster charge rate.
- NOTE: This will not however, pierce a Zoltan shield. It will deal 2 times 1 damage hits to it (as all beam weapons).
Flak Artillery
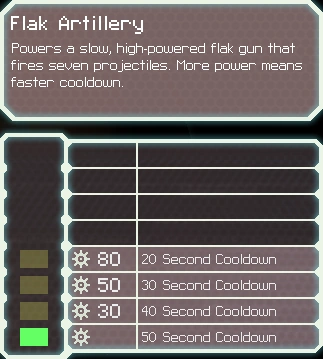
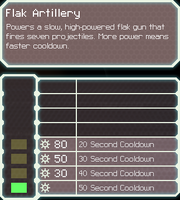
(Advanced Edition Federation Cruiser only)
Powers a slow, high-powered flak gun that fires seven projectiles. More power means faster cooldown.
- Installed on the Federation Cruiser The Fregatidae (Layout C)
- Automatically fires a 7-flak burst when powered.
- Powering off drains charge quickly.
- Upgrading means faster charge rate.
Clone Bay

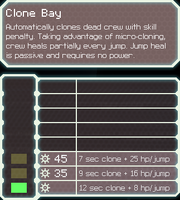
(Advanced Edition Content)
Automatically clones dead crew with skill penalty. Taking advantage of micro-cloning, crew heals partially every jump. Jump heal is passive and requires no power
- Replaces dead crew members after several seconds with a 10% skill penalty
- Crew will be permanently lost after 4 seconds if the bay is offline unless a Backup DNA Bank is installed.
- The clone bay does not need to be powered to activate the jump heal; ion weapons will negate healing.
- Upgrading reduces clone time and increases jump heal.
- Multiple dead crew can be queued for clone replacement.
- You can have either a Clone Bay or a Medbay installed, not both. But it is possible to switch between them at a shop, switching will inherit the upgrade level of the other system.
- Some random events which kill crew members also prevent growing a replacement, meaning crew can still be lost forever.
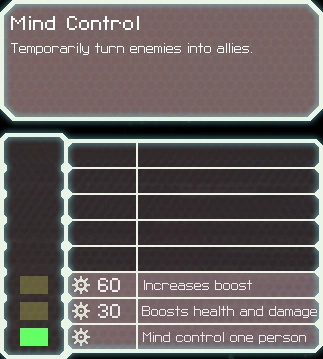
Mind Control

(Advanced Edition Content)
Temporarily turn enemies into allies
- Turns enemy crewmember into ally (whether on your ship or an enemy ship)
- Slugs cannot be mind controlled
- Like drones you can't give them orders, rather they are under AI control, but they can do anything your crew can: fight, man systems, repair, etc.
- Like your crew, they are also limited on the enemy ship. Upgraded doors will not open for them, and enemy Med Bays will not heal them.
- They will be treated as an intruder by the enemy crew. Anti-Personel drones and crew will attack them as the AI sees fit.
- Mind control requires view of enemy crew (Slug telepathy counts).
- Upgrades make controlled crew more powerful.
- Mind controlled enemies can be teleported to your ship.
- Mind control can remove enemy mind control from your crew members.
- Mind control is blocked by Zoltan Shields, unless you have the Zoltan Shield Bypass augment.
- Used in some events (Blue Options).
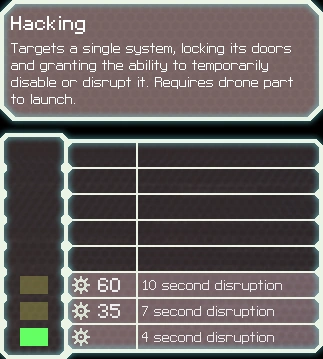
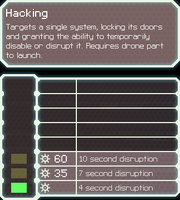
Hacking
(Advanced Edition Content)
Targets a single system, locking its doors and granting the ability to temporarily disable or disrupt it. Requires drone part to launch
- Launches a hacking drone that attaches to the enemy ship
- Drone can be shot down in transit but can only be removed if destroyed by the hacking system being hacked (so you can't move it either, choose wisely).
- Doors are locked and vision is granted on the system with a hacking drone installed. In addition, a hacked system does not benefit from manned bonuses. If Door Control is still functional, the doors will eventually close and lock again if a crewman has broken into or out of the room.
- Active effects vary by system
- Medbay, drains the health of all enemies in the medbay, your crew are unaffected.
- Weapon Control, gradually drains the current charge of all weapons on the ship and prevents them from being fired.
- On multiple charge weapons, only the current charge will be drained (e.g. If you have a Swarm missile launcher with 2 charges and it is currently preparing its 3rd charge, Hacking will drain the current charge but leave the 2 stored charges intact. However you will still not be able to fire the stored charges while being hacked.)
- Artillery Beam and similar Rebel Flagship weapons, gradually drains charge.
- Hacking, destroys the opponents hacking drone.
- Battery backup, disable bonus power and lock two more power bars.
- Drone Control, disables and sometimes destroys drones.
- Doors, locks all doors, inhibiting enemy movement and enabling allied movement around the ship.
- Teleporter, forcibly recalls any boarding parties launched by the affected ship.
- Piloting/Engines, reduces evasion to 0, if they're charging FTL it's also delayed.
- Oxygen drains O2 levels of ship
- Mind Control, temporarily turns one random enemy into an ally, and removes enemy mind control from allies.
- Cloaking, pushes enemy ship out of cloak.
- Clone Bay, crew currently being cloned is lost.
- Hacking a system that has a cooldown does not affect it's cooldown. (ex.: Hacking the cloaking system while it's on cooldown will not interact with the remaining cooldown time)
- Upgrading increases the time enemy systems stay disrupted.
- Cannot bypass (Zoltan) Super Shields, even with the Zoltan Shield Bypass augment.
Used in some events (Blue Options), usually to disable hacking instead of another system.
Subsystems
These systems are always powered and don't take power from the reactor, but can be disabled which makes them temporarily inactive until you repair them.
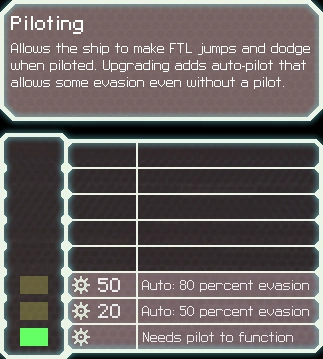
Piloting

Allows the ship to make FTL jumps and dodge when piloted. Upgrading adds auto-pilot that allows some evasion even without a pilot.
The only system that initially requires manning to be of any use (you need a pilot in order to jump between beacons).
- Manning:
- Activates the FTL drive
- Activates evasion, increased evasion depending on the crew member level of experience.
- Upgrading adds auto-pilot, meaning your ship has a fraction of normal evasion when not manned.
- Used in some events (Blue Options).
Sensors

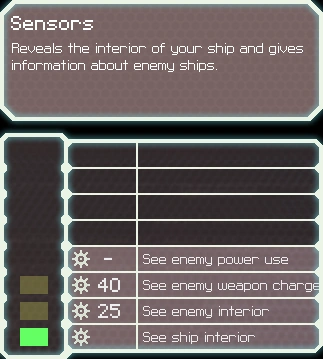
Reveals the interior of your ship and gives information about enemy ships.
- Reveals the interior of your ship
- Upgrading reveals the interior of enemy ships, a second upgrade displays their weapon charge status (with Advanced Edition; it shows enemy Power levels without AE).
- Temporarily disabled when in nebula.
- Used in some events (Blue Options).
- Manning this subsystem will make it work 1 rank above its current upgrade level; a manned level 3 sensor subsystem shows enemy power levels. (Advanced Edition)
Door System

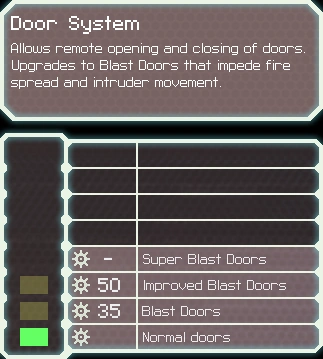
Allows remote opening and closing of doors. Upgrades to Blast Doors that impede fire spread and intruder movement.
Allows for the remote operation of the ships doors.
- Although simple in theory, doors have many uses:
- Can be used to vent oxygen from rooms in order to suffocate a fire.
- Opening interior doors between rooms with/without oxygen in order to equalize pressures between them
- Dealing with a superior boarding party with a weak combat crew either by suffocating the boarder via venting the rooms they inhabit, or locking them in a medbay while you fight them (may require maintenance of the oxygen system)
- Upgrading further impedes fire spread and intruder movement.
- A destroyed door system prevents remote operation of doors, but still allow crew (and boarders) to enter and exit rooms.
- If your door control is broken, the doors will appear a red-orange color.
- Manning this system will make it work 1 rank above its current upgrade level, the 4th level of this system can be only reached by manning it (Advanced Edition).
Backup Battery

(Advanced Edition Content)
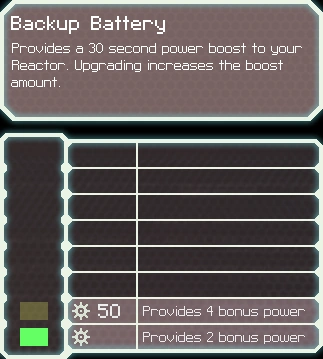
Provides a 30 second power boost to your Reactor. Upgrading increases the boost amount
- When activated adds 2 power to your reactor capacity for 30 seconds - upgrading the system adds a bonus 2 power to the activation.
- Battery power bars are applied to systems last after all other reactor power has been applied.
- They are invaluable in plasma storms, as the power provided by the battery is not affect by the storm.
- Bonus power is indicated by power bars with orange borders.
Powering and Upgrading
To power a main system, left click on it in the system bar. To unpower it, right click. This can be done at any time. Subsystems are automatically powered.
Each system can be upgraded to support more power. This is done in the "Upgrades" tab in the "Ship" menu, at the top of the screen. Powering a system additional levels will make it more powerful.
Damaged and Destroyed Systems
A system can take damage from weapons, offensive enemy drones, fires or boarders.
Weapons and drones instantly damage systems and the hull when they hit. For instance, if a weapon damages a system for 2 damage, it means that the system's max power is lowered by two until repaired. Further damage to the system lowers the maximum system power further until it is completely destroyed.
- In the case of ion weapons, rather than causing damage to the system, it deals ion damage that disables the system hit for the amount of ion damage that it caused over a duration of 5 seconds.
When a system is being damaged from a fire or a boarder an icon will show above the system (also when the sensors are disabled) indicating that the corresponding room is under attack. If a system is under attack for a given amount of time it will receive 1 damage (this is shown in the corresponding power bars). This also means that a system won't take any damage if the attack is interrupted, e.g. the fire is put out, or the boarder is forced to attack one of your crew members instead of the system.
When a system is completely destroyed (all power bars are fully damaged), the ship takes 1 hull damage if the finishing blow came from fire or boarders. If you destroy a system with weapons or in-space drones, no extra hull damage is dealt, and bombs cannot damage the hull directly even by destroying systems; however, bombs can indirectly damage systems and cause hull damage. For example, a Fire Bomb's fire will burn a system down, thus damage the ship.