mNo edit summary |
|||
| Line 322: | Line 322: | ||
<p style="line-height: 15.75pt;"><span lang="EN" style="color: rgb(213, 212, 212); font-family: "Helvetica","sans-serif"; font-size: 10pt; mso-ansi-language: EN;">Finally, the Flagship also has two special variants on Boarding Drones and the Defense Mark II drone. The key difference is they only use 2 power instead of the respective 3 and 4 the normal version do. For more information, look at the Drones page. The Drones are not in the table section but they are in the list section.</span></p> |
<p style="line-height: 15.75pt;"><span lang="EN" style="color: rgb(213, 212, 212); font-family: "Helvetica","sans-serif"; font-size: 10pt; mso-ansi-language: EN;">Finally, the Flagship also has two special variants on Boarding Drones and the Defense Mark II drone. The key difference is they only use 2 power instead of the respective 3 and 4 the normal version do. For more information, look at the Drones page. The Drones are not in the table section but they are in the list section.</span></p> |
||
| − | [[Category:Enemy Ships]] |
||
Revision as of 22:32, 29 October 2013
The Final Boss
The Rebel Flagship is the most powerful vessel in the Rebel Fleet, possibly the universe, and serves as the game's final boss in The Last Stand sector.
You start in a sector with multiple systems being taken over by the rebels. Jumping to these starts a battle with a tough Rebel Elite ship.
In addition, the silhouette of the Rebel Flagship is visible hovering around a beacon. Every couple of turns, it will jump closer to the Federation base, and if it gets too close, the game will end.
Your goal is to make it to the Flagship, and fight through its three stages to destroy it, and end the Rebel advance.
With each stage that you beat, the rebel flagship will jump away, closer to the fleet. This means that if it is only 1 jump away from the fleet but you have only knocked it down to round 2 you will not be able to defeat it before it reaches the federation base. However, if you knock it down to stage 2 and it is jumping to your base the same time as you are, you are still able to fight. If you FTL jump out of the battle at this stage, though, you will lose.
Contrary to popular belief, it is safe for your ship to FTL jump away from the boss at any time; the only danger is that this may allow the Flagship to get into the unwinnable situation described above. Depending on the map, you may be able to flee once or twice.
In each stage of the fight the boss has a different special ability.
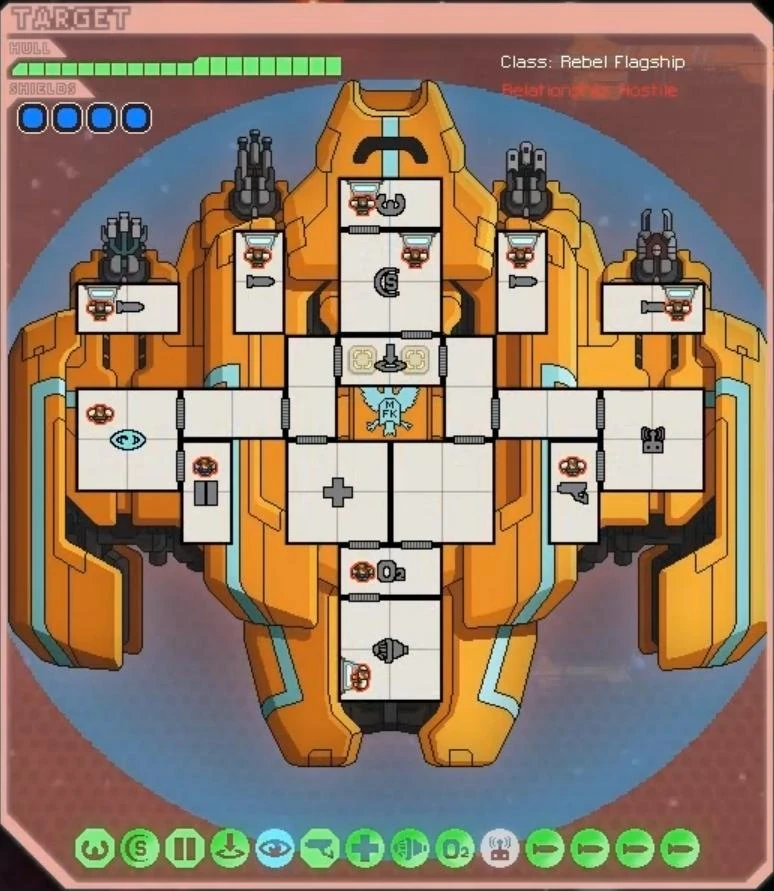
1st stage
Weapons
Each weapon has its own compartment, meaning if you are boarding the ship, you will have to do so four times, or use missiles.
The Final Boss 1st stage
- Triple Ion Cannon
- Heavy Triple Burst Laser
- Triple Leto Missile Launcher (Does not consume missiles)
- Boss Beam Weapon (2 damage)
Dodge Rate
Assuming cockpit and engines are unharmed and the engines are fully powered. Based off system health of the engines and cockpit.
- Base Dodge rate: 10%
- While fully manned 20% (22-30% if enemy crew has pilot/engine skill, assuming that's even possible)
- If unmanned 5%
Note: This assumes the Flagship operates just like a player ship. Exploration using the editor suggest the ship automatically recieves the fully manned bonus without crew. Granted, the player control Flagship had advantages the Boss Flagship did not have (Auto repair was on at all times while this only happens to the Boss Flagship if the entire crew is killed.).
Systems
- Drones (unused during 1st stage)
- Teleporter (limited and very rarely used during 1st stage)
- Cloaking (Will be automatically engaged at the start of the battle)
- Shields (4)
- Medbay
- Door Control
- Oxygen Control
- Engine
- Piloting
- Sensors
System health
- Weapons - 3 each
- Drones - 1
- Teleporter - 2
- Cloaking - 2
- Shields - 8
- Medbay - 3
- Door Control - 3
- Oxygen Control - 2
- Engine - 2
- Piloting - 3
- Sensors - 2
Special ability
- Level 2 Cloak (Instantly activates upon encounter)
After the Flagship jumps away, you will receive a small amount of scrap, and fuel, drones, and/or missiles. Also there is a slight chance for a random weapon or augment being dropped.
2nd stage

The Final Boss 2nd Stage
The boss now uses a special Defense Drone II that uses only 2 power instead of four, special version of the boarding drone that uses 2 power instead of 3, as well as an Anti-Ship I and a Beam Drone I. Drone Control goes from level 1 to level 8, and the engine gets slightly more powerful.
Weapons
- Heavy Triple Burst Laser
- Triple Leto Missile Launcher (Does not consume missiles)
- Boss Beam Weapon (2 damage)
Dodge rate
Assuming cockpit and engines are unharmed and the engines are fully powered. Based off system health of the engines and cockpit.
- Base Dodge rate: 15%
- If fully manned 25% (27-35% if enemy crew has pilot/engine skill, assuming that's even possible)
- If unmanned 7.5%
Note: This assumes the Flagship operates just like a player ship. Exploration using the editor suggest the ship automatically recieves the fully manned bonus without crew. Granted, the player control Flagship had advantages the Boss Flagship did not have (Auto repair was on at all times while this only happens to the Boss Flagship if the entire crew is killed.).
Systems
- Drones (Laser, Beam, Boss version of Defense Mk II, and Boss version of Boarding)
- Teleporter (Unused During Stage)
- Shields (4)
- Medbay
- Oxygen Control
- Engine
- Piloting
- Sensors
Note: The Defense Mk II and Boarding drone are special variants that uses less power (2 power instead of 4 and 3 respectively) but functions normally in all other ways; except being unavailable to the player (without cheating).
System health
- Weapons - 3 each
- Drones - 8
- Teleporter - 2
- Shields - 8
- Medbay - 3
- Oxygen Control - 2
- Engine - 3
- Piloting - 3
- Sensors - 2
Special ability
- Deploys six extra drones (randomly split between Beam and Laser) for around 5 seconds. These appear even if the drone control system has been destroyed.
After the Flagship jumps away, you will receive a small amount of scrap, and fuel, drones, and/or missiles. Also there is a slight chance for a random weapon or augment being dropped.
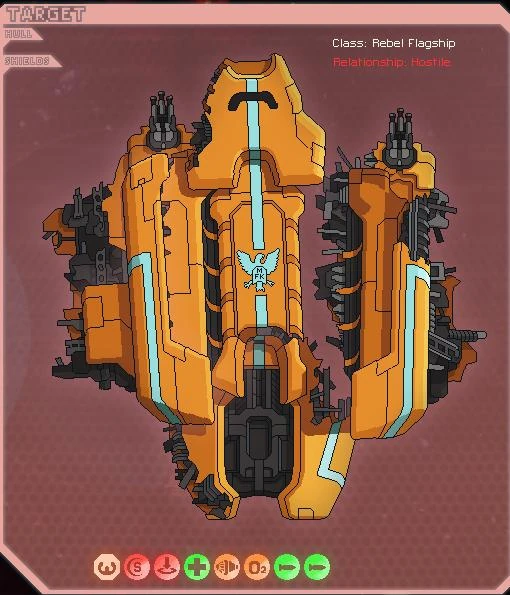
Final stage


The Final Boss 3rd Stage
The boss now has a Zoltan shield that absorbs more damage than a regular shield. Also, the weapon systems gain one more point or level and the engine doubles.
Weapons
- Heavy Triple Burst Laser
- Triple Leto Missile Launcher (Does not consume missiles)
Dodge rate
Assuming cockpit and engines are unharmed and the engines are fully powered. Based off system health of the engines and cockpit.
- Base Dodge rate: 28%
- If fully manned 38% (40-48% if enemy crew has pilot/engine skill, assuming that's even possible)
- If unmanned 14%
Note: This assumes the Flagship operates just like a player ship. Exploration using the editor suggest the ship automatically recieves the fully manned bonus without crew. Granted, the player control Flagship had advantages the Boss Flagship did not have (Auto repair was on at all times while this only happens to the Boss Flagship if the entire crew is killed.).
Systems
- Teleporter
- Shields (4)
- Super Zoltan Shield (12 bars)
- Medbay
- Oxygen Control
- Engine
- Piloting
System health
- Weapons - 4 each
- Teleporter - 2
- Shields - 8
- Medbay - 3
- Oxygen - 2
- Engine - 6
- Piloting - 3
Special ability
- It can either shoot 8 heavy laser shots, or bring its Zoltan shield back online. If any of your crew are on board when the Zoltan shield comes back on they will be stuck and can't be teleported back, until the shield is broken again.
Victory!

The Big Bad Boss finally bites the inter-planetary dust.
Finally, after three of the toughest fights in the game the Rebel Flagship has been destroyed!
After this long struggle the victory screen appears. It has the name of your ship as well as the names of every crew member that survived the encounter.
You will also have the words "Victory" if your ship is a new high score.
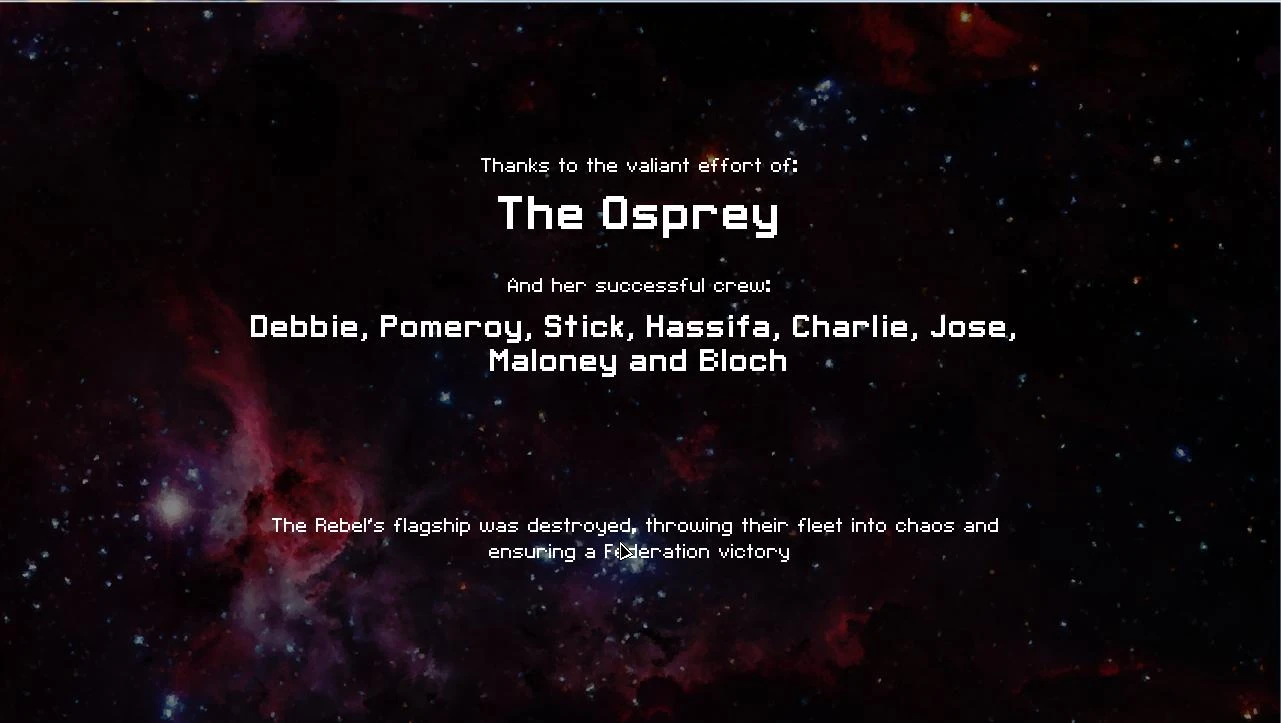

Victory screen.
Recommended Equipment
FTL is less strict than most roguelikes, as far as the equipment required to beat the last boss goes. Still, when you get to the Rebel Flagship, you absolutely must do two things:
- Not die, and minimize the risk of dying
- Destroy the Flagship, even if it takes a long time
These upgrades help you to fight the last boss while minimising any kind of risk:
- At least three layers of Shields
- At least level four Engines
- A way to damage the Flagship hull through its shields
- Max skills
- A full eight crewmembers
- Level 2 Doors to control fires and boarders
- An Ion/Beam weapon for the third phase (not neccessary, but will make things much easier.).
- A counter to missiles: This is the key point, and can be done in many ways. Most of the Flagship's weapons can be endured with a strong shield and high evasion, except for the missiles. If they hit your shields, weapons, engine, or pilot systems, and you don't have redundancy, it may be necessary to jump out and repair.
- Cloaking is a nearly perfect counter to missiles or superweapons to dodge them, and gives time to perform repairs so that you don't need redundant levels for damage buffer. However, it costs 150 scrap, and is unavailable to Federation Cruisers (note: the Federation Cruiser isnt unlocked until after you beat the boss). Moreover, the 20 second cooldown usually means you will be vulnerable every other volley: the missile system must be destroyed before the second salvo. Note that since you are dodging periodic attacks of short intensity, level 1 is all that is needed with good timing.
- A Teleporter can slowly disable all the Flagship's weapons without needing ammo. By prioritizing the missile system you should only take a few hits. However, you won't be able to use the boarding crew for repair and defense on your own ship. Less effective in round three when the Zoltan Shield will block sending and retrieving crew.
- Defense Drones to block missiles and Boarding Drones. If you don't have one or a couple combat specialists, the constant Boarding Drones will be huge trouble. Be aware Defense Drones can miss (expect at least one Boarding Drone to make it through), and cannot hit all three missiles the Flagship fires in a salvo. Two Defense Drones Mk I will be able to take down 80% of the boarding drones and almost every missile.
- The three most useful augmentations for the Rebel Flagship stage 1 are the Weapon Pre-Igniter, the Automated Reloader, and the Stealth Weapons. For stage 2, one could do worse than the Shield Recharge Booster, the Weapon Pre-Igniter, and the Zoltan Shield. For stage three, Rock Armor Plating and two levels of Shield Recharge are helpful. Repair Arm is also worth noting because your hull will be healed after each fight and you do not need to shell out 100+ scrap for a Hull Repair Drone.
- Redundant levels and a good repair crew: a Level 3 Pilot subsystem prevents a missile from knocking out all evasion. This is the least proactive strategy to cope with missiles, and it won't stop your hull from eventually collapsing.
- For the first two stages, a Fire Bomb or better yet, a Breach Bomb are great ways to take out the missile launcher. The Fire Bomb will injure the gunner, cause a fire which may injure the gunner further, and the gunner will be too busy with the fire to man the launcher which slows down the launcher by up to 2 seconds. You will need multiple Fire Bombs to kill the gunner and destroy the missile launcher. The gunner can’t heal which makes all damage permanent. A Breach Bomb will either destroy or nearly destroy the missile launcher in one hit, heavily injure the gunner, and it will cause a breach. The gunner will need to seal the breach before fixing the missile launcher, which will buy time to get a second bomb ready that can finish off both the gunner and the launcher.
Augmentations
Some Augmentations are not as useful end game as others. Consider swapping out economic Augmentations, like Drone Recovery Arm, in Sector 6, 7 and 8 for more offensive/defensive Augmentations, like Automated Reloader or Shield Charge Booster.
It is important to have your augments synergize well with each other, your equipment, and your strategy for the Flagship fight. For typical fights, a balance works great such as having both an Automated Reloader and a Shield Charge Booster, but in the Flagship fight, 2 Shield Charge Boosters works better in most cases. The Weapon Pre-Igniter is great for typical fights, really helps to get to the Flagship, and even helps taking out the Zoltan Shield in the 3rd stage of the Flagship fight, but it is largely useless in the 1st and 2nd stages. However, when the Weapon Pre-Igniter is paired with 1 or even 2 Breach Bomb Mark II's, Fire Bombs, or a combination, now you can delay (if gunner is still alive) or even take out the missile launcher at the beginning of the fight. Defensive strategies are not the only option. Three Automated Reloaders are especially devastating in the 2nd and 3rd stage if they are paired with 3 or 4 Laser Burst Mark I/II's (L.B. M1= 3.96 seconds; L.B. M2 4.32 seconds to reload). It can even be helpful (though not without risk of prematurely ending the fight too soon) in the 1st stage by either taking out the missile launcher or the medbay quickly.
In the Flagship fights, consider how helpful an augment is and odds that that an augment will help you. Rock Plating gives you slightly better than a 1 in 7 chance of saving you from hull damage. but you still suffer system and personnel damage. You might find Engi Med-bot more helpful since your away teams will heal faster, the rest of your crew will need less micromanagement, and it will be insurance in the unlikely event that a boarding drone or boarding party get on your ship (Flagship boarding drones sometimes make it through when 1 drone is up; could possibly get through 2 drones since drones do miss on occasion).

With a good setup and strategy, it's possible to defeat the Flagship while taking no damage.
Possible strategies for easy difficulty
- If you are using the Federation Cruiser (note: the Federation Cruiser isnt unlocked until after you beat the boss), you will need to upgrade your artillery beam; at level 4 this beam is devastating as it ignores all shields and can be recharged quickly.
- Pick up two laser weapons at least, as well as a missile/bomb based weapon, preferably Pegasus (two missiles can be useful in later stages).
- Make sure you have the maximum amount of crew that you can hold and you are ready to fight the final boss.
- Don't delay in engaging the flagship; although there are some profitable encounters on the last map, taking too much time lowers the number of repair spots and time available to visit them. Since you have to fight three stages you can't wait until the last second.
- IMPORTANT: Do NOT kill all of the crew members, only those on the main guns. If you do kill all of the crew an aggressive AI takes over and periodicaly repairs all of the systems that are damaged (similar to the Auto-Scouts except faster). A different approach to this is to leave the gunner just to the left of the cockpit alive, and kill the entire crew before going to the next phase. However, if you are relying on fire damage to win (not recommended) then you do not want to leave this crew member alive as he cannot put out the fires, and repair damaged sections, which you will need repaired in order to deal more damage to the hull. This makes taking out the drone bay and shields practically a joke as your crew will go unchallenged into every room after the first stage. DO NOT attempt this without first destroying their (level 3) med bay unless using crystal crewmembers and their lockdown ability.
- A good way to deal with med bay on the first stage, after you take care of people in isolated rooms manning guns, is to get your missile/bomb ready, teleport boarding crew in any room but medbay, fight till first bunch of Flagship's people run to medbay low-health, then missile/bomb said medbay, not only damaging/taking it out, but also killing those unfortunate souls. Even if you then have to recall boarding party and remaining crew repairs medbay, repeated application of this tactics will kill off everyone in the main compartment possibly before the medbay is out.
- IMPORTANT: If you do manage to kill the crew it does make the last stage of the boss much easier as you only need to worry about the super weapon. As for the aggressive AI, there are two ways to overcome the rapid repairs. One, use breach weapons. Like the AI ships, the flagship can't auto repair any system that has a breach in it. Two, it is easy to overcome at this stage with fire weapons as the damage from the flames is more than the AI's repairing rate, and fire also has a chance to spread causing futher damage to the ship without having to deal with the shields. Though until their shields are down beam weapons, with the exception of the Federation Cruiser's artillery beam, are useless and with the crew dead you're free to target the shields with Bombs and Missiles.
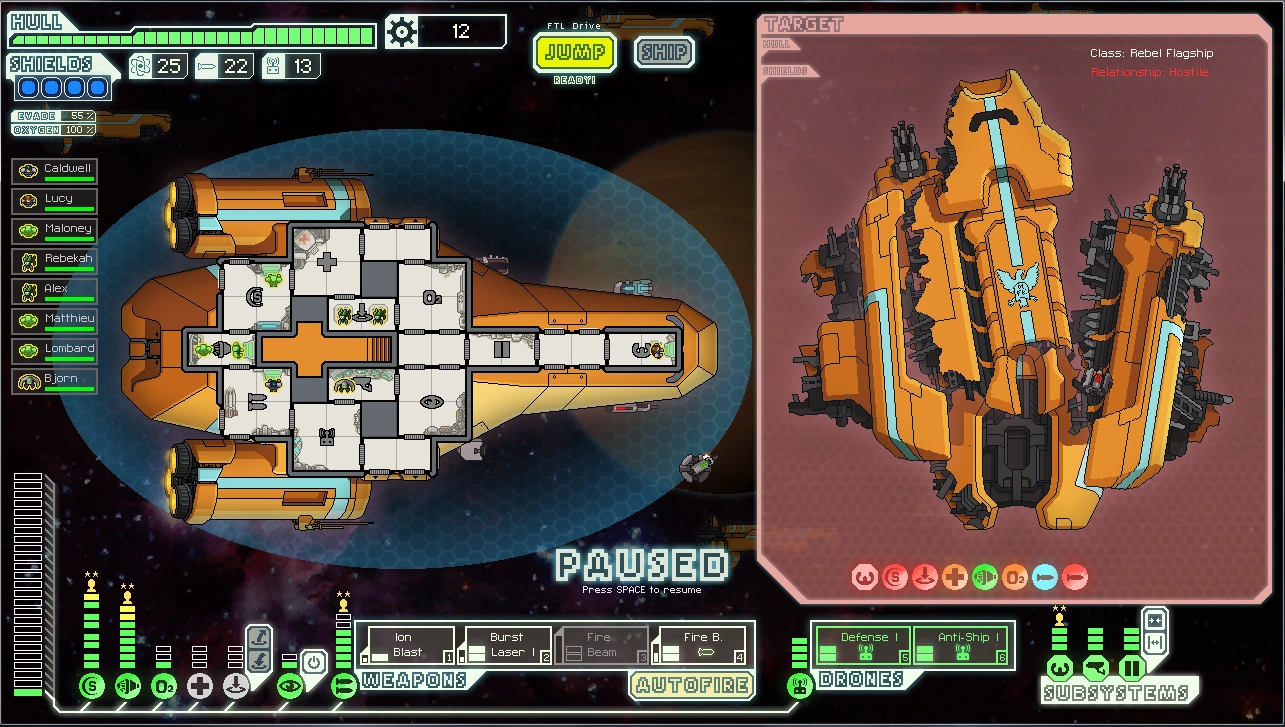
- In the first stage, teleport two crewmen onto the weapon directly to the right of the cockpit. This will take out the triple Leto missile launcher, the most dangerous weapon. Then take out every other weapon one by one. Once you have taken down all of the weapons power down the teleporter as you won't be using it until the next round.
- While your away teams are doing this you can start shooting for the shields; however, with a massive 4 points of shielding and a decent chance of dodging your attacks it is a tough nut to crack. If you have missile weapons you can easily bypass the shields and free up your laser weapons to tear it apart.
- Once you have defeated it for the first time you should try and visit a repair station to heal your ship. If a repair station is unavailable, you can use a hull repair drone to fully heal. It doesn't even need to be active during combat; just swap it in after you've beaten a boss stage and use it at your leisure.
- In the second round it is vital that you take out the weapons at the start again. Its super attack is a deadly swarm of drones that can tear apart any unshielded vessel in the 5-10 second period in which they remain on screen. However, with its weapons out of the picture, level 3 shields should be enough to survive. Before his weapons are down you can cloak to avoid the drone swarm - note that if you allow a L3 cloak to run its full length, it will recharge too slowly to avoid every wave. Decloak early, use Level 1 cloaking or take down the weapons. Then you will have to take out either its shields or its drone control, as its Defense Drone will take out any missiles that you shoot in this round (except for the Pegasus's 2-missile firing system).
- Now that you have reached the final round, this is where things get tricky. It has a Zoltan Shield which absorbs 12 points of damage AND regenerates when it doesn't take damage, so you will need to take it out before you can teleport in and take out the weapons. After the weapons have been taken care of you will need to take it out as quickly as possible; power down the teleporter and pour everything you have into the engines so that you can dodge the super attack. Alternatively, one can use a well-timed Level 1 cloak to dodge the super attack. This super attack shoots around eight Heavy Burst Lasers and is charged by the teleporter platform - this means that even if all of the weapons are offline you can still be hit by this. Take out it's shields as fast as possible then aim for the teleporter to delay the next super weapon shot.
- Congratulations! You have beaten the Rebel Flagship!
Boarding Strategy:
So far this strategy has only been tested with Mantis B, Stealth A and B, Rock A, Kestrel B, and ??? type B.
Recommended equipment, system levels, and personel:
- 4 gold level boarders. Mantis, Rock, and Crystal are the best so try to pick up these crewmembers whenever possible.
- Level 2 or 3 teleporter.The large one isn't required, but if yours is small you definately need it to be level 3 (or you need the healing bomb).
- Level 2 or 3 shields. Level 3 is safer, but level 2 is manageble with a high-level engine and a defense drone mark 2. Level 4 is just a waste of scrap.
- Level 6+ engines. More is better.
- Level 1 cloak. The super weapons the boss has fire off about every 25 seconds or so, so level 2 or level 3 cloak won't allow you to recloak in time.
- Defense Drone, preferably mark 2, though mark 1 also works well. With 4 boarders I also really like the system repair drone.
- Breach bombs, Pegasus Missiles, or Breach missiles.
- Any sort of laser or beam weapon (the power of the weapon doesn't matter here, except to make fights shorter).
- Level 2 or 3 doors.
- Level 2 medbay.
Round 1:
- Start by turning your defenses up to maximum. At the moment, you don't need any more offensive power than your teleporter, so turn your weapons off if it means having level 3 shields and near-maxed engines. A defense drone is nice here, but isn't required yet.
- Teleport 2 of your boarders into the missile launcher room (just to the right of the cockpit). Don't retreive them until they destroy the weapon.
- As soon as your teleporter is off cooldown, send your other boarders into the ion weapon room.
- When possible, retrieve your original boarders and then send them into the beam room.
- When those three weapons are dead, the only attack the boss has is the triple heavy laser. If you have a level 3 shield, feel free to reroute power from your engines to your weapon systems.
- After your boarders have been healed in your medbay, use your missiles or bombs to destroy the boss' medbay. (If you used breach weapons, wait until they fix the breach before continuing).
- Heal Burst is quite useful here.
- Get all of your boarders into their medbay as fast as possible. You should be able to kill nearly all of their crew before being forced to retreat since they won't be able to heal themselves. If you need to pull your boarders out, repeat the last two steps until only the gunner to the left of the cockpit is alive.
- Have your boarders take out the shield generator then pull them out.
- Use whatever weapons you like to destroy the helpless boss. It is mildly amusing to destroy it with a weapon only poor transport ships use (the dual lasers).
Round 2:
- Switch back to your defensive setup, but make sure that you have a defense drone on. You really don't want to have your non-combat crew having to deal with boarding drones here.
- Remember to use your cloak when you see the power surge warning. The extra six drones are the scariest thing the boss has, but fortunately it lasts for only five seconds.
- Teleport 2 of your boarders into the missile room again and take it out.
- When your teleporter has recharged, send your other two boarders into the drone control room and destroy it. This will stop the annoying boarding drones, the defense drone, and the normal anti-ship and beam drones the boss uses. Turn off the defense drone, and use that power to activate your weapons.
- Once the missiles have been destroyed, have those two boaders switch to the beam weapon room. Once that is destroyed, have them join the second group of boarders in the main section of the ship.
- Once the drone control is destroyed, take out the shields. Then retrieve your boarding crew.
- Kill the boss again with whatever weapons you see fit.
Round 3:
- Switch back to defense mode. Note that you do need at least 1 weapon active here. Don't forget to activate your cloak to avoid the super weapon shots. (Can also get you an achievement in the stealth cruiser).
- Take out the Zoltan shield. Ion/Beam weaponry is recommended.
- Send 2 of your boarders to destroy the missiles (again).
- Send the other 2 to take out the teleporter, then the shields. You may need to take out the Zoltan shield another time or two.
- Once the normal shields are down, retrieve your crew and destroy the boss (again) with your amazingly powerful dual lasers and/or leto missile launcher.
The hardest part is taking out the crew in round 1. After that it's a pretty easy fight as long as you leave the near-useless heavy laser gunner alive.
Possible strategies for normal difficulty
- Not everything is going to be handed to you on a silver platter. You have to adapt to a lot of situations in order to win. You can beat the boss without maxed out weapons, but all other systems must be adequately upgraded, or you won't stand a chance. Evasion is just as important as shields and weapon control, just not in early game. Also, having a weapon that can bypass shields (I.E Missiles, bombs, Artillery Beam) will be incredibly useful, but not mandatory. It would be wise to have at least enough firepower (excluding weapons that bypass shields) to take out 4 shields AND hit a room at least once. Drones, especially the defense drone, will be incredibly helpful as well.
- During the first stage of the boss fight, your main priority are the weapons, since they cannot be repaired if you kill the crew manning them (unless you kill off all of the crew/ship teleports away). Go for the triple missile launcher first if you don't have any defense drones, otherwise take out the triple ion blast. If you're not doing damage fast enough, then it might be a good idea to focus fire their shields first. Low damage or shield penetration will prevent you from damaging the flagship's weapons fast enough to protect you. If you have missiles/bombs, use those to take out the shields, then use your lasers to take out the weapons.
- During the second stage, it loses cloaking and ion blast, but starts using drones. It also has a special move telegraphed by the "power surge detected", which releases many more laser and beam drones. Disabling the drone control will not nullify the power surge, but will deactivate any other drones, particularly useful when the flagship has a defense drone. The Flagship will also release boarding drones. They will harass your crew non-stop, since you can't "guide" them to your medbay by opening all the doors except some. However, after a large number of defense drones, the flagship will eventually stop launching them. A defense drone of your own can quickly cut through those reserves. You want to target either the triple missile launcher or the drone system.
- Finally, the third stage, and the easiest if you have good shields and evasion. The Flagship starts off with an enhanced Zoltan Shield, taking more hits than a regular super shield would. In addition, the power surge shoots many lasers at once, OR fully recharges the super shield. It only has a triple heavy laser, and a triple missile launcher as weapons. This is a problem unless you have a weapon pre-ingniter because he can get a few shots off before you even take down the super shield, and possibly get a power surge off before you do any real damage. If you have 50% evasion and three layers of shields, the power surge should do little to no damage. The flagship will also start using it's teleporter. Thankfully, they can be "guided" to your medbay, and humans are only average in combat. Focus fire their shields or their weapons.
- Congratulations! If you have beaten the Flagship then give yourself a pat on the back, because Normal difficulty doesn't mess around. These tips are just guidelines, because situations will vary depending on the circumstances. Adaptability is key.
Cheat Strategy
This section is W.I.P. and is not fully completed. It will be completed shortly.
If you're willing to cheat, this strategy will work about 100% of the time if you can deal with certain things with *some* skill.
You need FTL Editor v15 in order to cheat, so go ahead and download it if you want to use this strategy.
Preparations (Follow these EXACTLY, they'll be explained later on.)
- Go ahead and get to The Last Stand, either by playing normally or by cheating. After you get to The Last Stand, exit the game and run FTL Editor.
- To run FTL Editor, double click on the .jar file, and follow the prompts. After the program has started up, click on "Saved Game" on top and then "Open." Go into My Documents, My Games, FasterThanLight, and select continue.sav.
- Change your ship to the Type B Federation Cruiser (by clicking on change ship). (You could use Type A as well, because you are going to scrap-cheat to upgrade it.)
- Go back to Player Ship and add Ion Bombs as each of the four weapons by clicking on the squares labeled 1, 2, 3, and 4.
- In the bottom right hand corner, select Augments. Change the Augments to Zoltan Shield, Weapon Pre-Igniter and Shield Charge Booster.
- Go ahead and add crew members and be sure to max out their skills. I recommend using 2 Engis, 2 Rockmen, 2 Mantis, and 2 Zoltans. The Zoltans help handle out the massive power demand by this strategy, but you can choose your own crew. Make sure to man your stations when you start the game!
- Click "General," next to Augments, and set fuel, missiles, and scrap to something like 50000. Press save and open up FTL. Press continue. Your new ship should be seen.
- Use the Ship button to max out every single one of your ship's stats. Power distribution should be as follows: max shields, max engines, all of the Ion Bombs armed, one power in oxygen, one in medbay, and the "Missile" fully powered. Keep in mind that if you don't have a Zoltan, you'll be forced to sacrifice power from one fo these (I recommend sacrificing it from engines if need be) in order to keep everything else in check.
- It is highly essential in order to man the engines, shields, and piloting station along with making sure an Engi is at the Artillery Beam in order to keep it running and ready to fire. Also make sure weapons are ready to fire at all times.
Round One:
- If one of your "essential systems," stated above, fail, allocate all crew not manning another essential system to repair it.
- Have your Ion Bombs each target one of the Flagship's weapon stations and make sure they're on autofire.
- It's not necessary to fire on the shields because Ion Bombs are considered missiles.
Notes:
- The Federation Cruiser is chosen because of the Artillery Beam able to fully penetrate shields.
- The basic principle of this strategy is to survive long enough for the Artillery beam to shred the Flagship.
- The Zoltan Shield is useful to hold out some extra damage for the first round, but some like to stack another Shield Charge Booster
Exploring the Flagship via FTL Editor v15
Using the ComaToes Profile/SavedGame Editor (AKA FTL Editor v15), it is possible to look at the Flagship(s), its weapons, and its drones. It’s even possible to play as the Flagship(s). The information gleaned with the editor is likely not 100% accurate as a player control ship is not 100% like the boss encounters. The editor is still the best source presently available.
There are 3 models for the Flagship corresponding to the 3 stages. The hull strength varies slightly (20 in the 1st and 3rd stage/model and 22 in the 2nd stage/model). Unlike the boss encounter, when the hull of the 1st or 2nd model is depleted, your ship is destroyed and you see the game over message. Reactor power varies greatly but is always higher than a player can get without Zoltans or cheating; 1st=42, 2nd=44, and 3rd=31. What’s odd about these power amounts is the Boss would have leftover power even with all systems fully charged. The 1st stage could only be charged up to 31 (11 leftover), 2nd stage 35 (9 leftover), and final stage 29 (2 leftover). This assumes the Flagships weapons operate like Special Weapons. Even if you assume the power surge special abilities use actual power, that wouldn't explain the first stage that has no power surge. The power surge special abilities are unavailable to the player.
Playing as the Flagship also showed some odd things. Unlike the boss encounters, the Flagship's auto repair is turned on even when you still have crew. I had a crew member repairing a badly damaged system along with the auto repair. The crewmember sometimes did not receive repair EXP because of the auto repair system got the finishing repair. I did not need a crew member in the cockpit (or even on the ship) for an FTL jump, and I also still received a manned bonus for both the cockpit and the engines even when no one was there. If those positions were manned, the crew member received experience and upon the first level up, I would get for example that extra 2% to evade. I presume this is true for shields as well. Just to be clear, I could fly the ship without any crew. If my crew died, the game kept going so long as the ship was still flying. While flying my empty ship, I encountered a ship which demanded I give them a slave, I picked the "Draw Straws" option and the slavers flew away. While playing as the Flagship, you are still limited to 8 crew. While in the editor, I accidentally gave myself 9 crew. When I started the game, I was immediately prompted to dismiss one.
When you play as the Flagship, the ship's layout converts to the player's ship layout. In the editor, no work station is visible, but when you play the game as the Flagship, the work stations and other doodads appear. Most are unremarkable with 2 exceptions. One, the 4-person medbay becomes a 3 person medbay with the bed doodad appearing. Two, the four manned weapon stations don't appear. In the player menu, the weapon section and drone control are literally on top of each other.
The first 2 stages have 4 drone slots while the third stage has none. When playing as the later stages of the Flagship, you can try to buy replacement systems for the systems you don't have but they won't appear. This includes Weapon Control.
Finally when playing as the Flagship, you do not have the Flagship weapons. Instead, you have the Federation Cruiser special weapon. You might technically have 2 or even 4 of these, but the game interface doesn't let you put power in the other special weapons. There is only one Special Weapon spot on the player's menu (both upgrade menu and normal gameplay). I might have done it by allocating power in the editor but I am not certain and it was a fight to allocate any power in the editor.
You can get a version of the Flagship weapons by giving them to non-Flagship ships via the editor. All the weapons required only 1 point of power and have graphics corresponding to the weapons the Flagship uses. The missile launcher didn't consume any missiles. There was two version of the triple heavy burst laser. The only performance difference was one had a 16 second cool down while the other had 20 second. The other weapons all had 20+ seconds cool down with the longest belonging to the Ion weapon. It should be noted the game files also had a normal weapon version of the Federation Cruiser special weapon. This version took 40 seconds, which corresponds to a level 2 version of the special weapon, not level 1. It is possible the normal versions of the Flagship weapons are also the equivalent of a level 2. For more information, look at the Weapon page. The weapons are not in the table sections but they are in the list sections.
Finally, the Flagship also has two special variants on Boarding Drones and the Defense Mark II drone. The key difference is they only use 2 power instead of the respective 3 and 4 the normal version do. For more information, look at the Drones page. The Drones are not in the table section but they are in the list section.