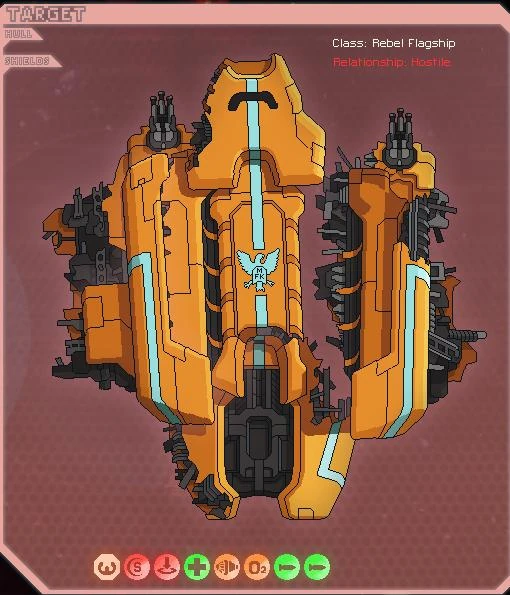
The Rebel Flagship is by far the most powerful vessel in the Rebel Fleet, and serves as the game's final boss, located in The Last Stand sector.
At The Last Stand, the silhouette of the Rebel Flagship is visible hovering around a beacon, marking its location. Every two jumps you make, it will jump closer to the Federation base, taking a total of 6 or occasionally 8 turns to reach the base. If it remains at the base for 3 consecutive turns, the Flagship will destroy the base and end the game in a Rebel victory.
Your goal is to intercept the Flagship, fighting through three stages to destroy it and ensure a Federation victory. With each stage that you beat, the Flagship will jump away, nearing the Rebel fleet. It will wait for one turn before jumping back to assault the Federation base.
At the end of the first and second stage, the Flagship will lose a part of its hull along with the rooms, systems, and weapons in the corresponding location. Other systems will be installed on the next stage, changing its behavior dramatically.
On the second and third stage, the Flagship has a special ability called "Power Surge" which will be triggered periodically and cannot be disabled by the player, much like Environmental Hazards.
Hull and system damage of the Rebel Flagship will be repaired on the next stage. Breach and fire will also be cleared. Only the crew is persistent through each stage; crew members killed are not replaced on the next stage. If the player jumps away from the Flagship before completing a stage, the same applies, with one exception: the crew is fully replaced if the player retreats during the first stage.
Unlike other battles, killing the entire enemy crew won't defeat the Flagship. Instead, a message will pop up pointing out the AI took control of the ship. The Flagship will then behave like an automated ships: undamaged systems are treated as manned (even those that are hacked), and damaged systems are all progressively repaired at a set rate, except those with fire or a breach in their room.
The Flagship's "weapons" are artillery systems, each located in its own room. They cannot be manned, despite containing crew. These rooms are also isolated from the main structure of the ship (with an exception on hard mode).
Although the Flagship uses a missile launcher, it does not consume any missiles and will therefore never run out of ammunition.
After the Flagship jumps away, the player will receive a small amount of scrap, fuel, drone parts, and/or missiles. There is also a slight chance for a random weapon or augment being dropped.
Flagship variation
On Easy mode with Advanced Edition Content disabled, the Flagship only has 3 layers of shield instead of the usual 4 (which means the shield system level is 6 instead of 8). This applies for all three stages.
On Hard mode, two additional rooms link the Laser and Missile ones to the main section of the ship. This makes it more difficult to stop the enemy repairing them.
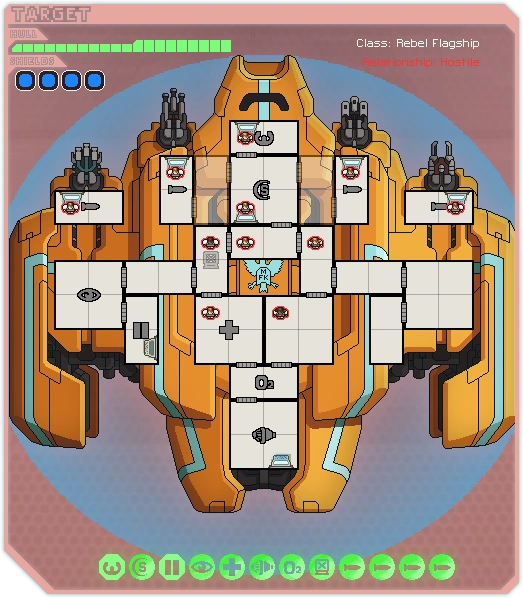
1st Stage
General
The Final Boss, 1st stage (transparent rooms only exist on Hard mode)
Like any other ship, the Flagship consumes 1 drone part to deploy its hacking drone. This means it is possible (yet difficult) to avoid being hacked entirely by shooting down 10 hacking drones in a row with a Defense Drone.
Crew: The remaining crew from the previous stage (Minus the one in the Ion room if left alive).
Drone parts: 10
Like on the previous stage, it is possible to avoid being boarded entirely by shooting down the Boarding Drone until the Flagship runs out of drone parts. Since it uses 4 drones at once, this can happen quite quickly.
Note that drones from the Power Surge don't consume drone parts.
The Flagship deploys extra drones (randomly split between Beam and Combat) for approximately 5 seconds. The number of extra drones depends on difficulty: 4 on Easy, 6 on Normal, and 7 on Hard.
These drones appear even if the drone control system has been destroyed. Hacking the drone system does not stun the power surge drones (even when the system is online).
Dodge rate
Assuming cockpit and engines are unharmed and the engines are fully powered. Based off system health of the engines and cockpit.
Base Dodge rate: 15%
If fully manned 25% (Enemy crew is unskilled regardless of difficulty)
If unmanned and Piloting room is empty: 12%
If controlled by AI: 25%
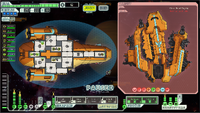
Final stage
The Final Boss, 3rd stage (transparent rooms only exist on Hard mode)
With its drones gone, the Flagship now relies on its Zoltan shield, power surges, and boarding crew to overcome the player.
After every 3 laser Power Surges, the 4th will instead fully restore the Zoltan Shield.
If any of your crew are on board when the Zoltan shield comes back on, they will be stuck and can't be teleported back until the shield is broken again (unless you have Zoltan Shield Bypass).
Dodge rate
Assuming cockpit and engines are unharmed and the engines are fully powered. Based off system health of the engines and cockpit.
Base Dodge rate: 28%
If fully manned: 38% (Enemy crew is unskilled regardless of difficulty)
If unmanned and Piloting room is empty: 22%
If controlled by AI: 38%
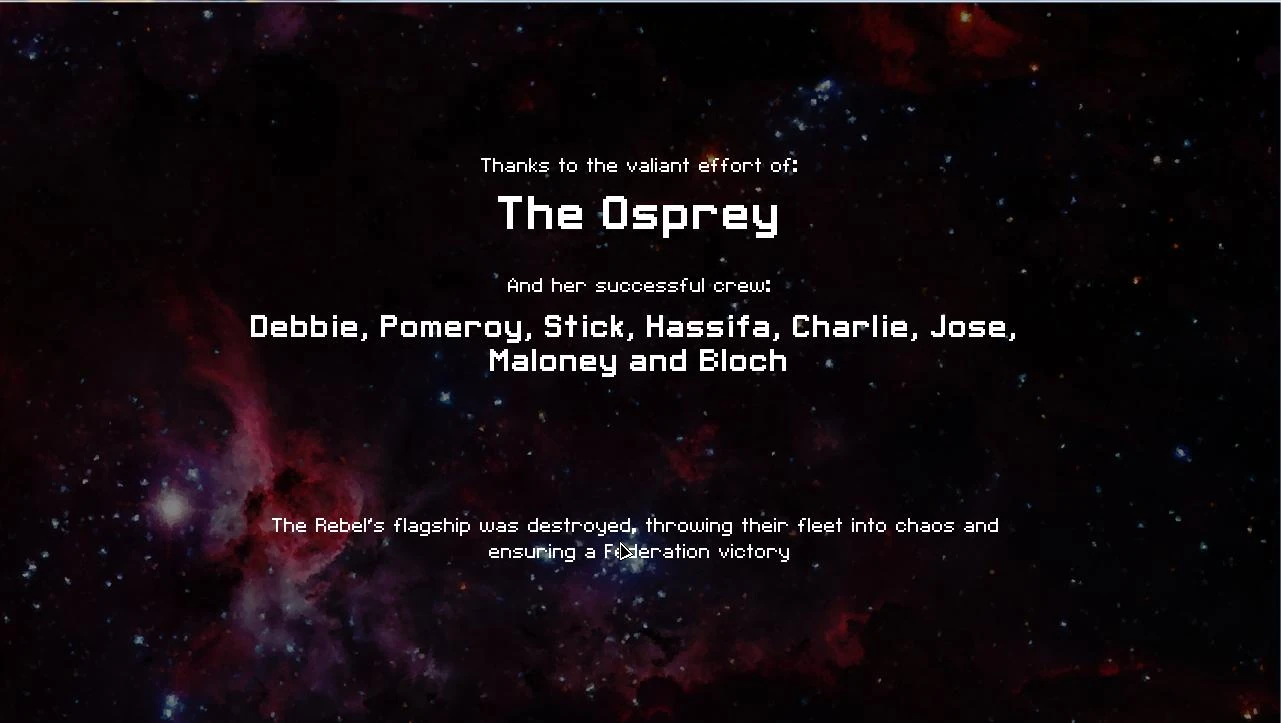
Victory!
The Big Bad Boss finally bites the inter-planetary dust.
Victory screen.
Victory Text
After this long struggle, the victory screen appears. It has the name of your ship as well as the names of every crew member that survived the encounter (excluding those who were on board the Flagship when it was destroyed in the final phase). If your ship is destroyed at the same time you destroy the Flagship, it will count as Victory as well.
You will also have the words "Victory" if your ship is a new high score.
Recommended upgrades
The Flagship has high damage output, especially in phases 2 and 3. Good defences will make the fight much safer:
Aim for level 5 engines and at least 3 shields, 4 shields if possible.
Cloaking is very useful, for dodging missiles and power surges.
Defence drone are less effective, but still useful.
Mind control and upgraded doors are helpful against phase 3 boarders.
Upgrade oxygen to level 2, to prevent a phase 1 oxygen hack killing your crew.
Upgrade piloting to level 2, to prevent a single hit knocking out all your evasion.
Consider damage buffers to other critical systems too (upgrading them one extra bar, for resilience against a single hit). Good candidates are shields, cloaking, mind control, and weapons.
Strong offence is equally useful. There is no perfect defence against the power surges in phases 2 and 3, so given enough time the Flagship will eventually destroy you. Ending the fight quickly will limit the damage you take. Look for some of the following:
A strong weapons setup that can deal damage through 4 shields, even with several misses
Hacking to remove the Flagship's shields or evasion
A teleporter to disable the Flagship's isolated weapons
A way to kill the main crew in phase 1
Your offence should not rely heavily on missile weapons, since the defence drone in phase 2 will shoot them down. It cannot stop you using hacking, however.
Tips and Tricks [Easy and Normal Difficulty]
With a good setup and strategy, it's possible to defeat the Flagship while taking no damage.
Taking out the Boss Missile Weapon (middle right) is key to minimizing damage. With a Crew Teleporter, send two crew to take it out each Stage.
Use a missile/bomb weapon to breach shields, then fire a volley with two or three laser weapons.
Use a Defense Drone Mk I to minimize damage.
Do NOT kill all of the Flagship's crew. If you do, an aggressive AI takes over and automatically repairs all of the systems that are damaged (similar to the Auto-Scouts). Instead, aim to keep the crew member alive in the Boss Laser Weapon (middle left) since he'll remain trapped there for all three Stages.
Mind Control, then Teleport mind controlled crew. This allows you to pick off enemy crew one-by-one, without dealing with the rest of the crew. Ideally used in Stage 1.
Rely on fire damage to win; though, fires/breaches will disable repairs from the ship's aggressive AI.
Damaging crew outside of the Medbay may lure them to the Medbay to heal. If timed right, you can attack the Medbay to disable healing and pick off crew in one shot.
Once you have defeated Stage 1, visit a repair station beacon. If a repair station is unavailable, you can use Hull Repair Drones outside of (or during) combat.
The Stage 2 Power Surge drone swarm can deal critical damage to your ship if your Shields are disabled, but level 1 Cloaking can dodge the entirety of the Power Surge if activated at the exact same time.
When boarding with a four-seat Crew Teleporter, sending all four boarders to any of the Weapon rooms will cause two to "overspill" into the main area of the ship. Stage 1's level 3 Doors can hurt this greatly, but it can be used effectively in Stage 2 or Stage 3 (when the Zoltan Shields have been dropped).
The Stage 3 Zoltan Shield absorbs 12 points of damage AND regenerates via Power Surge. Power Surges may also launch a volley of 7 laser shots, regardless of how many weapons it has functioning. Level 1 Cloaking can evade these shots. Be mindful of enemy crew boarders and Mind Control.
Boarding Strategy:
This strategy has been successfully used on most ships and elements of it should always be considered among the primary options. The core idea behind it is to use a relative safety of Stage 1 boss with missiles and EMPs disabled to set you up for much easier Stages 2 and 3, which normally could prove quite problematic and can not, unlike Stage 1, be "pacified" with a fast and limited effort.
To that end, at Stage 1 we are aiming at killing all Flagship personnel in main compartment, leaving only one dude in enclosed harmless weapon room (normally Lasers to the immediate left, Beam to the far right at Hard). This means some way of overcoming a high-level Medbay, either via Crystal Lockdown, hacking, or targeting it with missiles/bombs. Lasers can also work, but mean that you may need to commit an entire barrage towards disabling the medbay, leaving no projectiles to target other systems like cloaking, doors, missiles, etc.
Two general tactics could be employed: either taking out medbay first and then fighting crew coming there while preventing it from coming back online (such as with breaches, healing bombs for your boarders, hacking, fires, etc), or boarding at a different room and timing your missile/bomb/hacking efforts in such a manner as to kill low-health enemies the moment they enter a medbay (or, for true micro/timing mages, en route there).
Most of the time you will need repeated "go"s to finish everyone off. Care should be taken as to not deplete boss's hull before this is accomplished.
Third variant to the same end could be called the reverse boarding technique and borders on mechanics-abuse. Mind-controlled enemy crew counts as your own for the purpose of Crew Teleporters. Therefore mind-control, teleport back to your ship, and wait for it wear off while following him around with a "quarantine team." Abduct, quarantine, rinse, repeat until all desired enemy personnel are dispatched.
Useful equipment, system levels, and personnel:
Good boarding team, at minimum 2 green skill, as ideal 4 gold skill. Mantis, Rock, and Crystal are the best so try to pick up these crewmembers whenever possible.
Level 2 or 3 teleporter.The large one isn't required, but if yours is small you definitely need it to be level 3 (or you need the healing bomb or Rock/Crystal boarders or Clone Bay).
Level 6 or 8 shields. Level 8 is safer, but level 6 is manageable with a high-level engine.
Level 6+ engines. More is better.
Level 2 or 3 cloak. The super weapons the boss has fire off about every 25 seconds or so, so level 2 or level 3 cloak won't allow you to recloak in time, but you still need a damage buffer so you can keep cloak online if it gets damaged.
Defense Drone, preferably mark 2, though mark 1 also works well (if you have 3+ shield layers you might actually WANT mark 1 if by chance lasers and a missile come at once). With 4 boarders I also really like the system repair drone.
Breach bombs, Pegasus Missiles, or Breach missiles. Or Hacking. Or Crystal Lockdown (on a dude or on a bomb).
Any sort of laser or beam weapon (the power of the weapon doesn't matter here, except to make fights shorter).
Level 2 or 3 doors.
Level 2 clonebay. It is your best way to deal with never-ending brigades of boarders in your ship.
Mind control: If combined with cloak and upgraded this can allow the mind-controlled missile gunner to destroy the system even before it can fire off a volley. Also good for giving you reinforcements aboard the Flagship when you board and good for covering your own ship in the third phase when the teleporter is used (a Level 2 Mind control system will ensure an enemy boarding party is severely undermined as your mind-controlled crewman will prevail as a result of the damage and health boost though this is not significant enough to leave him/her with much health). A Level 3-mind-controlled victim will have a larger amount of health once the control wears off and thus it is not recommended to use it, unless you have him in the full medbay and intend for him to die, in which case the extended duration makes up for the extra health and is the only way to ensure death.
Level 2 or 3 Hacking: Excellent substitute for Crystalline Beings or Lockdown Bombs. Put this guy on the Medbay, power it down, board the medbay, then as soon as it's full just turn it back on. The crew inside dies from the joint power of the hacked medbay and your boarding crew, which then has a chance to destroy the medbay, allowing them to do their job as normal. Excellent with four-person teleporter.
Provided you necessarily need Teleporter and auxiliary systems are limited to the total of 3, you will want at least 1 of remaining 2 to be of "defensive" nature (Drone bay and/or Cloak). Setup of Teleporter-Hacking-Mind Control is the most problematic because of it's extreme vulnerability both to whatever volleys of missiles Flagship will send each stage before missile launcher is neutralized and to stage 3's "taking fire while working on Zoltan shield". This could be worked around with stuff like weapon pre-igniter (pre-igniting missiles to missile launcher) and Zoltan bypass, but you are far from guaranteed to ever see those.
Which means, yes, ships with Hacking and Mind Control as their starting systems are naturally unfit for the boarding boss tactics.
Round 1:
Start by turning your defenses up to maximum. At the moment, you don't need any more offensive power than your teleporter, so turn your weapons off if it means having level 6 shields and near-maxed engines. A defense drone is nice here, but isn't required yet.
Teleport 2 of your boarders into the missile launcher room (just to the right of the cockpit). Don't retrieve them until they destroy the weapon.
As soon as your teleporter is off cooldown, send your other boarders into the ion weapon room. Forget this step if you have level 8 shields.
When possible, retrieve your original boarders and then send them into the beam room.
When those three weapons are dead, the only attack the boss has is the triple laser. If you have a level 3 shield, feel free to reroute power from your engines to your weapon systems.
After your boarders have been healed in your medbay, use your missiles or bombs to destroy the boss' medbay. (If you used breach weapons, wait until they fix the breach before continuing). An even better strategy is to hack the medbay while it's intact, then board it with hacking off, then as soon as it's full turn hacking on and start a hacking pulse. This eliminates any chance of missing, reduces damage to your boarders by distracting enemy crew with breaking out of the medbay, and eliminates the missile cost.
Heal Burst is quite useful here.
Get all of your boarders into their medbay as fast as possible. You should be able to kill nearly all of their crew before being forced to retreat since they won't be able to heal themselves. If you need to pull your boarders out, repeat the last two steps until only the gunner to the left of the cockpit is alive.
Have your boarders take out the shield generator and piloting then pull them out. If some boarders are not gold-level yet, you can train them on the various systems. Just remember not to destroy the Oxygen, and if you used missiles against the medbay remember that destroying a system takes out one of the ship's hull points: You don't want to accidentally destroy the ship with your boarding crew.
Use whatever weapons you like to destroy the helpless boss. It is mildly amusing to destroy it with a weapon only poor transport ships use (the dual lasers), or even better, the basic laser. Hull Laser Mk. II does an excellent job at dispatching it fast, as does the Glaive Beam.
Round 2:
Switch back to your defensive setup, but make sure that you have a defense drone on. You really don't want to have your non-combat crew having to deal with boarding drones here.
Remember to use your cloak when you see the power surge warning. The extra six drones are the scariest thing the boss has, but fortunately it lasts for only five seconds.
Teleport 2 of your boarders into the missile room again and take it out.
When your teleporter has recharged, send your other two boarders into the drone control room and destroy it. This will stop the annoying boarding drones, the defense drone, and the normal anti-ship and beam drones the boss uses. Turn off the defense drone, and use that power to activate your weapons.
If you have a four-seat teleporter, you can do both at once by sending all four boarders to the missile launcher: Two of them will "overspill" into the piloting, and can reach the drone control unimpeded since the second stage ship has no door system.
Once the missiles have been destroyed, have those two boarders switch to the beam weapon room. Once that is destroyed, have them join the second group of boarders in the main section of the ship.
Once the drone control is destroyed, take out the shields and piloting. Then retrieve your boarding crew.
Kill the boss again with whatever weapons you see fit.
Round 3:
Switch back to defense mode. Note that you do need at least 1 weapon active here, or the Zoltan Shield Bypass. Don't forget to activate your cloak to avoid the super weapon shots. (Can also get you an achievement in the stealth cruiser).
Take out the Zoltan shield. Ion/Beam weaponry is recommended. If you have Zoltan Shield Bypass, just beam your guys in and laugh at the idea that they could possibly be stopped.
Send 2 of your boarders to destroy the missiles (again).
Send the other 2 to take out the shields. You may need to take out the Zoltan shield another time or two.
Once the normal shields and piloting are down, retrieve your crew and destroy the boss (again) with your amazingly powerful dual lasers and/or leto missile launcher. If you can set the flagship on fire, do so, and kill the laser guy, so the AI takes over and the fire does constant hull damage. And you can get the "Some people just like to watch ships burn" achievement.
The hardest part is taking out the crew in round 1 (unless you have hacking, in which case it's laughably easy and you might actually laugh at the pathetic little humans trying to run away from their inevitable demise). After that it's a pretty easy fight as long as you leave the near-useless laser gunner alive.
Extra Tips and Tricks
All plans require a lot of scrap, and the higher the difficulty, the less you get.
Therefore you should really start paying attention at less conventional "fast-kill" strategies, which are way more specific in configuration and might take serious bit of shopping around, BUT which easily save you 400+ scrap in shields and engines not needed because you don't plan to stay and "withstand boss fire", you plan to stealth-dodge a couple, Zoltan a couple, soak up a small couple, even, but destroy the flagship before taking too much damage. Honestly, you see a Vulcan? Grab it if at all possible! And suddenly you don't have to worry about "battle with a boss", you only have to worry about "how to sustain 4 health levels in my weapon system + 2 more or 2 in attacking drone system for a small bit of support for 50 seconds under boss fire". Bring DNA storage and hull repair drone, and you could afford it on 1-hp-hull, all-other-systems-red, fully vented all crew dead ship!
Bear in mind that if you strategy requires a certain realistic amount of luck (like 50%), you can jump away from the Flagship, repair and go again.
Some of the fast-kill strats and "suicide survival" ideas are already mentioned. Other, you are free to discover, explore and add!
During the first stage of the boss fight, your main priority are the weapons, since they cannot be repaired if you kill the crew manning them (unless you kill off all of the crew/ship teleports away). Go for the triple missile launcher first if you don't have any defense drones, otherwise take out the triple ion blast. If you're not doing damage fast enough, then it might be a good idea to focus fire their shields first. Low damage or shield penetration will prevent you from damaging the flagship's weapons fast enough to protect you. If you have missiles/bombs, use those to take out the shields, then use your lasers to take out the weapons.
During the second stage, it loses cloaking and ion blast, but starts using drones. It also has a special move telegraphed by the "power surge detected", which releases many more laser and beam drones. Disabling the drone control will not nullify the power surge, but will deactivate any other drones, particularly useful when the flagship has a defense drone. The Flagship will also release boarding drones. They will harass your crew non-stop, since you can't "guide" them to your medbay by opening all the doors except some. (Note: The Boss's drone system has a power queue just like yours, if the boarding drone annoys you, just do 1 point of damage to the drones system and the drone will power down for the duration of the battle, or until the monkeys with wrenches the rebels call crew patch it together. The defense drones are last in the cue, so only a boarding crew can reliably shut down the defense drones.) However, after a large number of defense drones, the flagship will eventually stop launching them. A defense drone of your own can quickly cut through those reserves. You want to target either the triple missile launcher or the drone system.
Finally, the third stage, and the easiest if you have good shields and evasion. The Flagship starts off with an enhanced Zoltan Shield, taking more hits than a regular super shield would. In addition, the power surge shoots many lasers at once, OR fully recharges the super shield. It only has a triple laser, and a triple missile launcher as weapons. This is a problem unless you have a weapon pre-ingniter because he can get a few shots off before you even take down the super shield, and possibly get a power surge off before you do any real damage. If you have 50% evasion and three layers of shields, the power surge should do little to no damage. The flagship will also start using its teleporter. Thankfully, they can be "guided" to your medbay, and humans are only average in combat. Focus fire their shields or their weapons.
It is possible to reliably land a hacking drone during Phase II via powering down the hacking system the instant the Flagship's defense drone fires its shot at the hacking drone, then repowering the system after the laser misses. Powering down the system during this timeframe can be done easily by continously pausing and unpausing the game until the shot is fired.
You can depower your O2 system if you need more engine power. Some players will only do this in Phase III.
Tips and Tricks [Hard Difficulty]
Now the Laser and missile system is connected to the main body of the Rebel flagship. This is critical to a lot of boarding strategies and overall strategies which concentrate on disable the missile system. Now the crew can heal up and even repair those systems, which isn't possible in the easy and normal difficulties.
The extra 2 enemy crew, the lack of scrap, and the cloak can make it impossible to kill the crew in Phase I. Sometimes, its better to kill the crew in Phase II.
Actually the fact that the rooms are connected might present you with more advantage. If you are able to kill enemy crew members via certain means, such as crystal lockdown, you can just keep one enemy alive while your borders remain on the ship wrecking havoc. Keep the enemy medbay intact and then the enemy will continuously heal in the medbay, preventing the flagship from going into auto mode.
The 1st and 2nd phase is more or less easy, if you are able to knock out the Rebel flagship quickly enough, but the 3rd stage is now a lot harder, as you have to deal with more boarders (2 from the weapon systems) and repairable weapon systems, as you get boarded.
A very skilled and balanced crew is very vital!
Or it isn't. One way to survive Stage 3's avalanche of boarders is to just vent the ship aggressively, relying on Clone Bay to keep crew in existence, running around distracting boarders being the last miserable thing their original bodies do (unless we're talking Lanius ofc, in which case it's all just business as usual). You can win without manned bonuses on your stuff; you cannot with your ship overrun with boarders.


 Piloting (3)
 Shields (8)
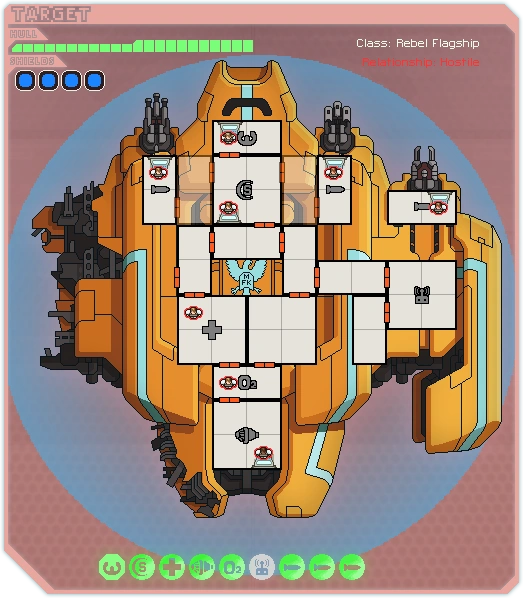


